-
Notifications
You must be signed in to change notification settings - Fork 0
v0.4.0 Lab 8 Build an ACR driven solution
In this lab, you will
- Update the template you created in Lab 1 to leverage the modules you published to the ACR instead
- Learn how to extend the template with new solutions
- Step 1 - Modify the workload file to use Bicep Registry
- Step 2 - Add new resources
- Step 3 - Add Diagnostic Settings and RBAC
- Step 4 - Update your workload
- Step 5 - (Optional) Incorporate a bicepconfig.json
In the previous lab you published all the necessary modules to Bicep registry. You will now use them to (re-)deploy the workload you deployed in Lab 1.
-
Go to the Azure portal and navigate to the
artifacts-rgResource Group -
Navigate to the container registry you specified in Lab 2.
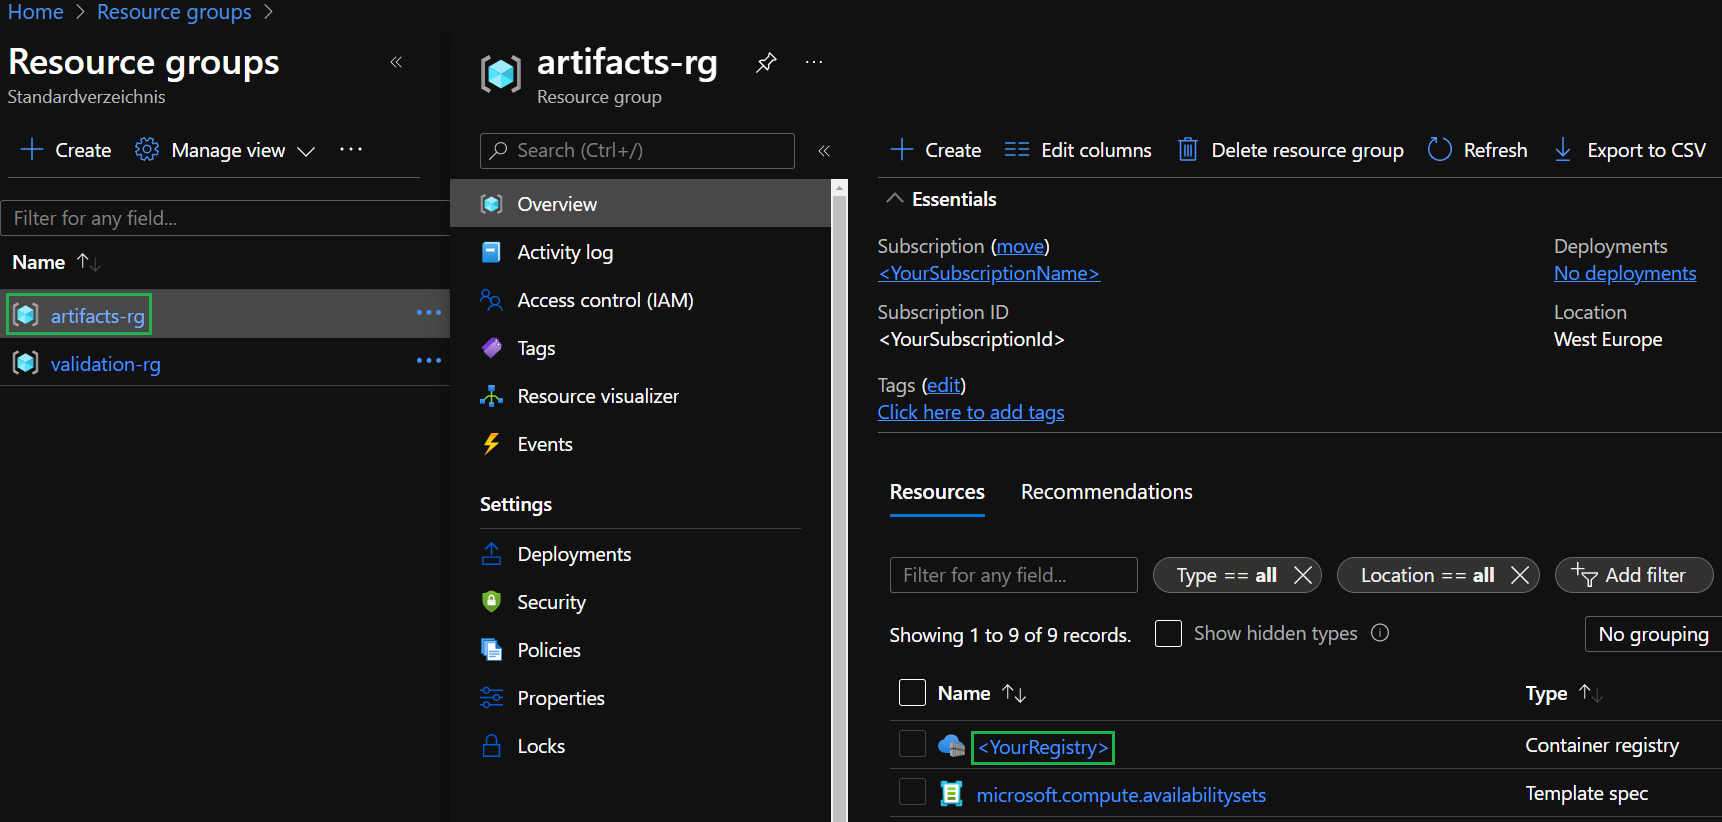
-
Click on the container registry resource and go to the
Repositorieslist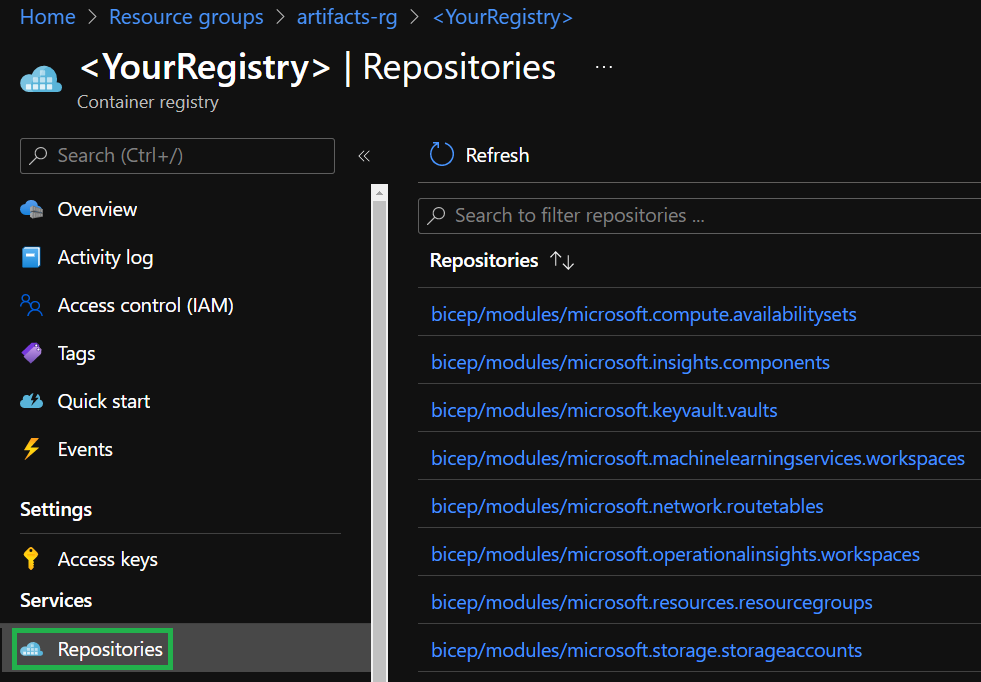
-
Select the
bicep/modules/microsoft.resources.resourcegroupsreference and the latest version in the list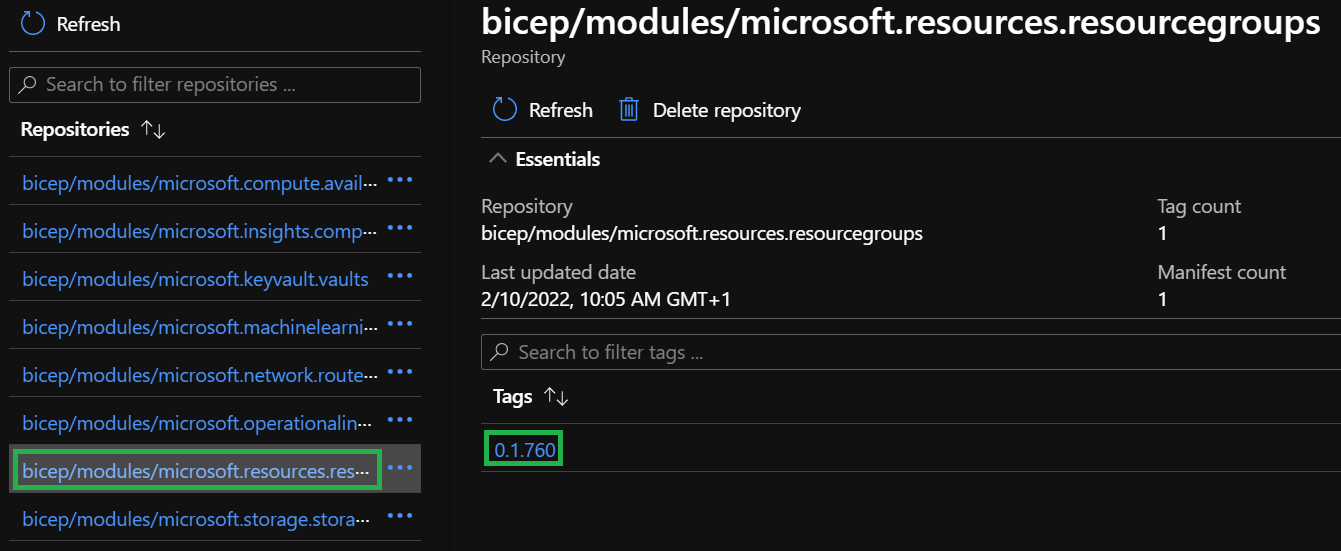
-
Finally, take note of the
Artifact referencefield
-
Repeat the previous step for all of the following resource types:
Name Reference Resource Group bicep/modules/microsoft.resources.resourcegroupsStorage account bicep/modules/microsoft.storage.storageaccountsLog Analytics workspace bicep/modules/microsoft.operationalinsights.workspacesApplication Insights bicep/modules/microsoft.insights.componentsKey Vault bicep/modules/microsoft.keyvault.vaultsMachine Learning service bicep/modules/microsoft.machinelearningservices.workspaces -
Open the
deploy.bicepfrom Lab 1. In this file you still have the module reference set to the local file.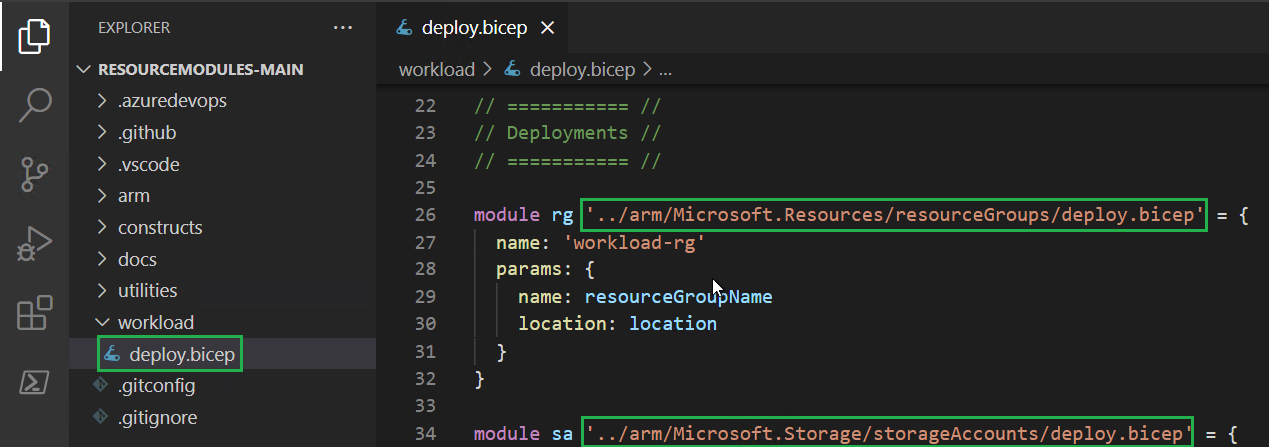
-
Replace each module's local reference the sequence:
`br:` + `<the matching reference you noted down>` -
Once done, all references should look similar to:
module rg 'br:<YourRegistry>.azurecr.io/bicep/modules/microsoft.resources.resourcegroups:<YourVersion>' = {}
module sa 'br:<YourRegistry>.azurecr.io/bicep/modules/microsoft.storage.storageaccounts:<YourVersion>' = {}
module kv 'br:<YourRegistry>.azurecr.io/bicep/modules/microsoft.keyvault.vaults:<YourVersion>' = {}
module law 'br:<YourRegistry>.azurecr.io/bicep/modules/microsoft.operationalinsights.workspaces:<YourVersion>' = {}
-
Now, re-run the template's deployment like you did in Lab 1. The deployment should succeed (even if no changes will happen).
$inputObject = @{
    DeploymentName     = "CARML-workload-$(-join (Get-Date -Format 'yyyyMMddTHHMMssffffZ')[0..63])"
    TemplateFile       = '<FullPathToYourTemplateFile>' # Get the path via a right-click on the template file in VSCode & select 'Copy Path'
    Location           = '<LocationOfYourChoice>' # E.g. WestEurope
    Verbose            = $true
    ResourceGroupName  = '<NameOfTheResourceGroup>' # E.g. workload-rg
    StorageAccountName = '<NameOfTheStorageAccount>' # Must be globally unique
    KeyVaultName       = '<NameOfTheKeyVault>' # Must be globally unique
    LogAnalyticsName   = '<NameOfTheLogAnalyticsWorkspace>' # E.g. carml-law
}
New-AzSubscriptionDeployment @inputObject
You will now modify the template to deploy a Machine Learning service. In this step you will
- Use resources that have dependencies on others, demonstrating how easy it is to reference resources created by modules
- Add additional resources from your private Bicep registry and see how easy it can be to interact with it
-
The Machine Learning resource requires a reference to an Application Insights Workspace instance. To get things started, add the
microsoft.insights.componentsbicep registry reference you copied earlier. For example:module appi 'br:<YourRegistry>.azurecr.io/bicep/modules/microsoft.insights.components:<YourVersion>' =
-
Next, select the area right behind the
=character and pressspace. This should open a context menu that, as in Lab 1 for the local path, offers you to auto-populate the module with all required parameters.
-
As you can see, Application Insights requires two parameters,
nameandworkspaceResourceId. Please enter the details as follows- Add a
applicationInsightsWorkspaceNameparameter to the parameters section - Fill in the module properties as you did for the other resources (i.e. scope, deployment name). For the
workspaceResourceIduse theresourceIdoutput of thelaw-module deployment.
The result should look similar to:
// Params section
@description('Required. The name of the log analytics workspace to deploy')
param applicationInsightsWorkspaceName string

// Deployments section
module appi 'br:<YourRegistry>.azurecr.io/bicep/modules/microsoft.insights.components:<YourVersion>' = {
    scope: resourceGroup(resourceGroupName)
    name: 'workload-appi'
    params: {
        workspaceResourceId: law.outputs.resourceId
        name: applicationInsightsWorkspaceName
    }
}
You may notice we didn't ask you to add a dependency to the
lawmodule deployment. This is not required, as Bicep creates an implicit dependency since you're using thelaw-module's outputlaw.outputs.resourceId. - Add a
-
You can now add the 'Machine Learning' module:
- Insert the registry-reference
- Let Bicep generate the required parameters
- Add a parameter for the workspace
name - Add a reference to the corresponding
associatedparameters (appi,kv,sa) - Set the SKU to
Basic
// Params section
param machineLearningWorkspaceName (...)

// Deployments section
module mlw 'br:<YourRegistry>.azurecr.io/bicep/modules/microsoft.machinelearningservices.workspaces:<YourVersion>' = {
    scope:
    name:
    params: {
        associatedApplicationInsightsResourceId:
        associatedKeyVaultResourceId:
        associatedStorageAccountResourceId:
        name:
        sku:
    }
}
-
Add a new empty line in the
mlw'sparamblock. Once done, pressspacewhich should open a popup that shows you all available parameters for the module. If you further pressCtrl + Spaceit should also lead all the metadata for these parameters, which means it shows for example a description for each. Now, select thesystemAssignedIdentityparameter and set it totrue.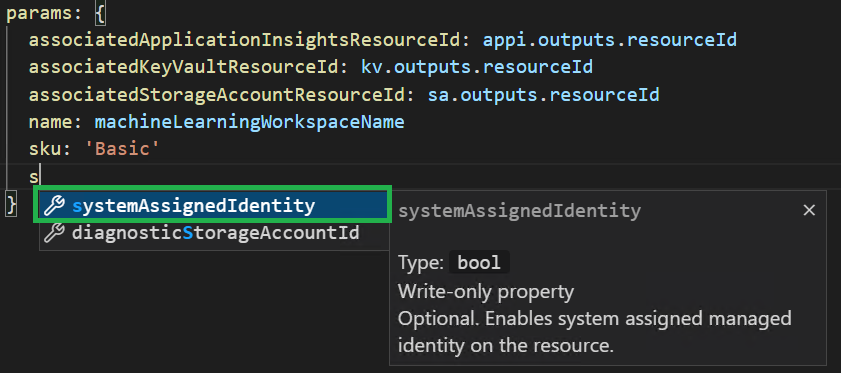
-
The result should look similar to the following:
// Params section
@description('Required. The name of the Machine Learning workspace')
param machineLearningWorkspaceName string

// Deployments section
module mlw 'br:<YourRegistry>.azurecr.io/bicep/modules/microsoft.machinelearningservices.workspaces:<YourVersion>' = {
    scope: resourceGroup(resourceGroupName)
    name: 'workload-mlw'
    params: {
        associatedApplicationInsightsResourceId: appi.outputs.resourceId
        associatedKeyVaultResourceId: kv.outputs.resourceId
        associatedStorageAccountResourceId: sa.outputs.resourceId
        name: machineLearningWorkspaceName
        sku: 'Basic'
        systemAssignedIdentity: true
    }
}
There are also a few other features you can enable easily. For example RBAC & DiagnosticSettings for your resources.
-
You can add Diagnostic Settings to the
Machine Learning Workspace,Key Vault&Storage Accountmodule by adding the following line to each of theirparamblocks:diagnosticWorkspaceId: law.outputs.resourceId
Note: Optionally, you could also set additional parameter such as
logsToEnableto specify which logs to set exactly. By default, all are enabled once a diagnostic target is specified.Note: Linter may warn you that you should explicitely specify the module's
locationparameter once you added the Diagnostic Settings. To do so, you can just addlocation: locationas well. -
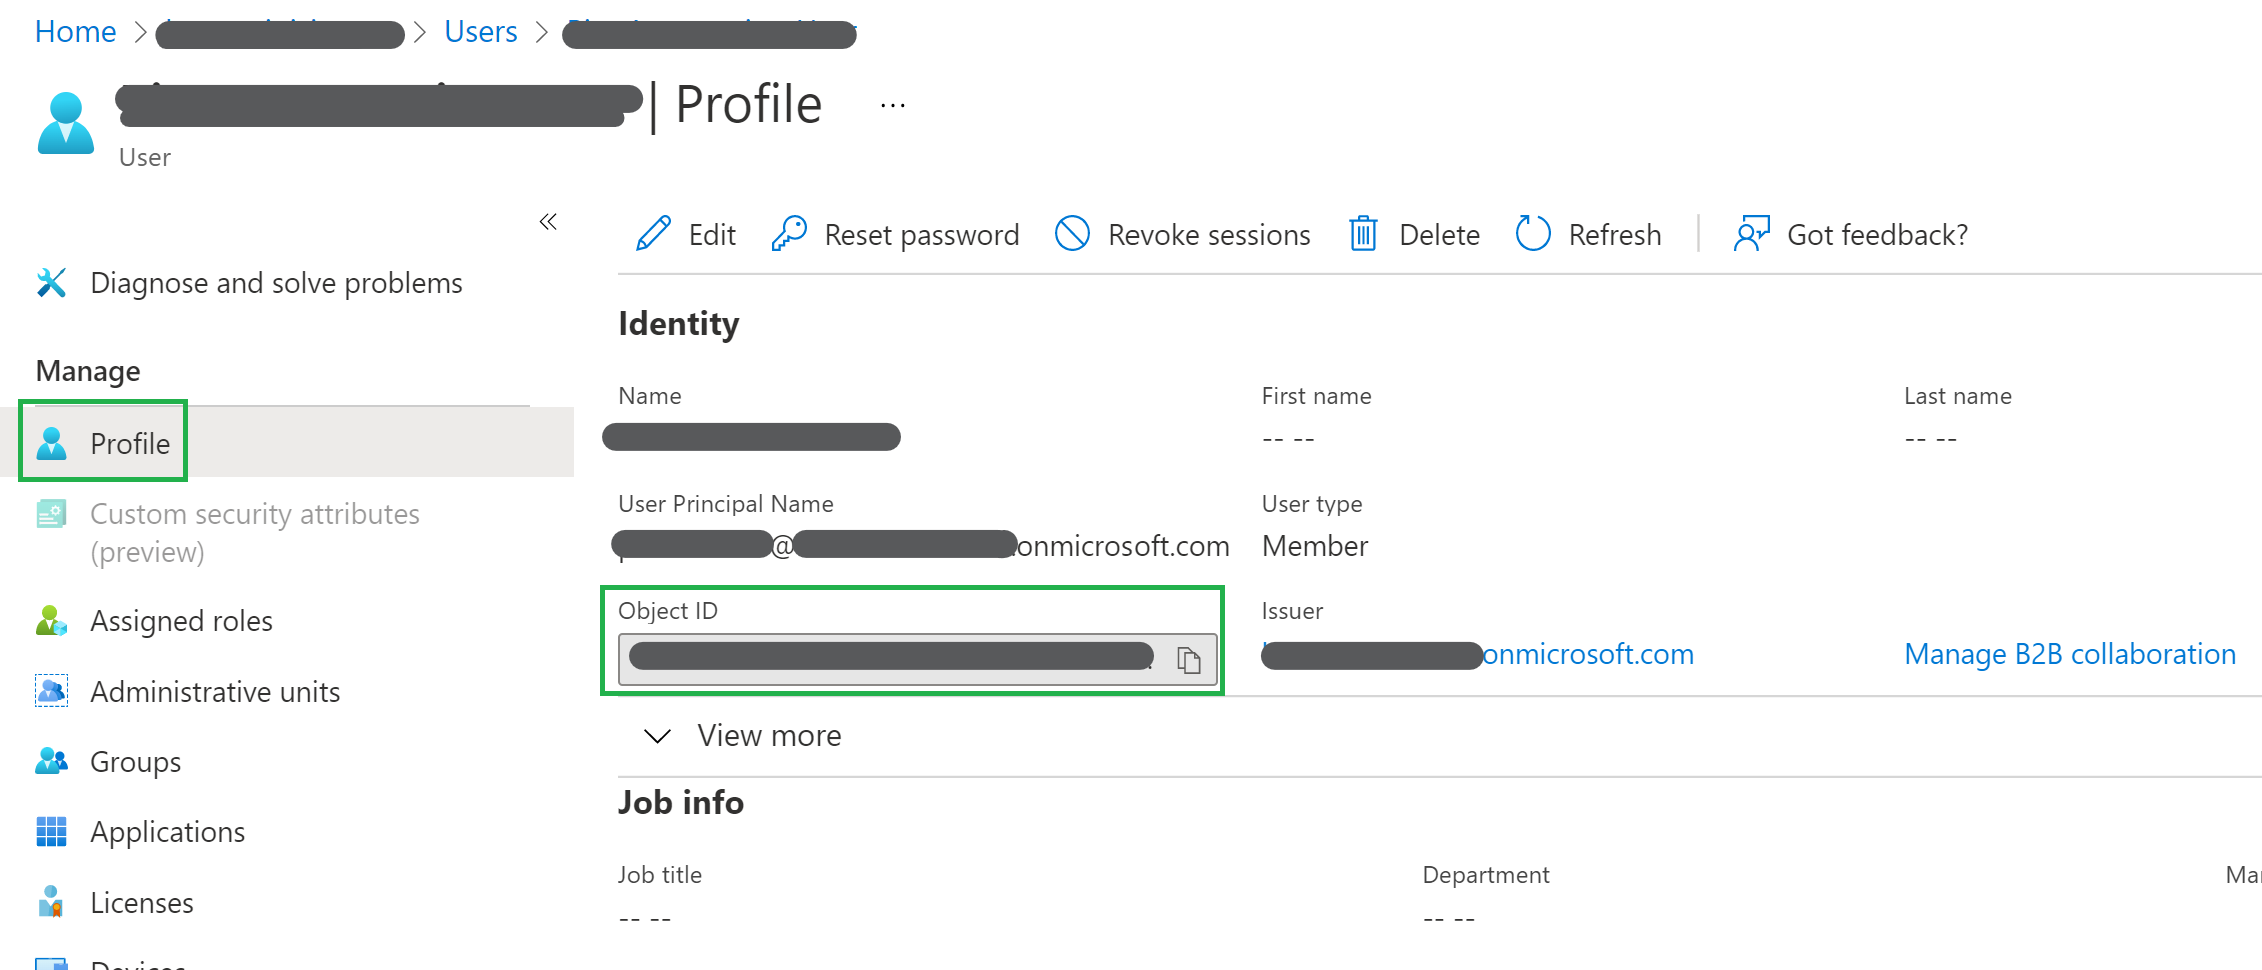
To add RBAC to any of the resources you first need to know the object ID of the principal to assign a role to. You can use the one of the Service Principal you're using to deploy, or get the object ID from Azure Active Directory.
-
Each module that supports RBAC has an example specified in its readme. For example, when navigating to the Resource Group readme you can find the following example:
    ### Parameter Usage: `roleAssignments`

    ```json
    "roleAssignments": {
        "value": [
            {
                "roleDefinitionIdOrName": "Reader",
                "principalIds": [
                    "12345678-1234-1234-1234-123456789012", // object 1
                    "78945612-1234-1234-1234-123456789012" // object 2
                ]
            },
            {
                "roleDefinitionIdOrName": "/providers/Microsoft.Authorization/roleDefinitions/c2f4ef07-c644-48eb-af81-4b1b4947fb11",
                "principalIds": [
                    "12345678-1234-1234-1234-123456789012" // object 1
                ]
            }
        ]
    }
    ```
As you can see, the role assignments parameter expects an array of objects, where each element captures a
roleDefinitionIdOrNameas well as yet again another array ofprincipalIdsto assign the role to. -
Next, add the following parameter to the template parameters:
@description('Optional. The role assignment to add to the resources')
param roleAssignments array = []
The parameter will be optional in case you'd not want to assign any IDs. You will combine the information you gathered above in the subsequent step.
-
Finally, add the following snipped to any resource(s) param-block you want. All of support RBAC out of the box.
params: {
    (...)
    roleAssignments: roleAssignments
    (...)
}
Any role assignment we pass in as a template parameter will be passed down into the module and applied to its resource.
The completed end result should look similar to:
targetScope = 'subscription'

// ================ //
// Input Parameters //
// ================ //

@description('Required. The name of the resource group to deploy')
param resourceGroupName string

@description('Optional. The location to deploy into')
param location string = deployment().location

@description('Required. The name of the storage account to deploy')
param storageAccountName string

@description('Required. The name of the key vault to deploy')
param keyVaultName string

@description('Required. The name of the log analytics workspace to deploy')
param logAnalyticsWorkspaceName string

@description('Required. The name of the log analytics workspace to deploy')
param applicationInsightsWorkspaceName string

@description('Required. The name of the machine learning workspace to deploy')
param machineLearningWorkspaceName string

// =========== //
// Deployments //
// =========== //

module rg 'br:<YourRegistry>.azurecr.io/bicep/modules/microsoft.resources.resourcegroups:<YourVersion>' = {
  name: 'workload-rg'
  params: {
    name: resourceGroupName
    location: location
  }
}

module sa 'br:<YourRegistry>.azurecr.io/bicep/modules/microsoft.storage.storageaccounts:<YourVersion>' = {
  scope: resourceGroup(resourceGroupName)
  name: 'workload-sa'
  params: {
    name: storageAccountName
  }
  dependsOn: [
    rg
  ]
}

module kv 'br:<YourRegistry>.azurecr.io/bicep/modules/microsoft.keyvault.vaults:0.4.740' = {
  scope: resourceGroup(resourceGroupName)
  name: 'workload-kv'
  params: {
    name: keyVaultName
  }
  dependsOn: [
    rg
  ]
}

module law 'br:<YourRegistry>.azurecr.io/bicep/modules/microsoft.operationalinsights.workspaces:<YourVersion>' = {
  scope: resourceGroup(resourceGroupName)
  name: 'workload-law'
  params: {
    name: logAnalyticsWorkspaceName
  }
  dependsOn: [
    rg
  ]
}

module appi 'br:<YourRegistry>.azurecr.io/bicep/modules/microsoft.insights.components:0.4.774' = {
  scope: resourceGroup(resourceGroupName)
  name: 'workload-appi'
  params: {
    workspaceResourceId: law.outputs.resourceId
    name: applicationInsightsWorkspaceName
  }
}

module mlw 'br:<YourRegistry>.azurecr.io/bicep/modules/microsoft.machinelearningservices.workspaces:<YourVersion>' = {
  scope: resourceGroup(resourceGroupName)
  name: 'workload-mlw'
  params: {
    associatedApplicationInsightsResourceId: appi.outputs.resourceId
    associatedKeyVaultResourceId: kv.outputs.resourceId
    associatedStorageAccountResourceId: sa.outputs.resourceId
    name: machineLearningWorkspaceName
    sku: 'Basic'
    systemAssignedIdentity: true
  }
}

// ======= //
// Outputs //
// ======= //

@description('The resource ID of the deployed resource group')
output resourceGroupResourceId string = rg.outputs.resourceId

@description('The resource ID of the deployed storage account')
output storageAccountResourceId string = sa.outputs.resourceId

@description('The resource ID of the deployed key vault')
output keyVaultResourceId string = kv.outputs.resourceId

@description('The resource ID of the deployed log analytics workspace')
output logAnalyticsWorkspaceResourceId string = law.outputs.resourceId

@description('The resource ID of the deployed application insights')
output applicationInsightsResourceId string = appi.outputs.resourceId

@description('The resource ID of the deployed machine learning workspace')
output machineLearningWorkspaceResourceId string = mlw.outputs.resourceIdYou can now re-deploy your template to update the existing, and add the new resources.
-
As we added a few additional parameters, the deployment command will likewise change slightly from what you used in Lab 1. To deploy the template, you can refer to the following:
$inputObject = @{
    DeploymentName                  = "CARML-workload-$(-join (Get-Date -Format 'yyyyMMddTHHMMssffffZ')[0..63])"
    TemplateFile                    = '<FullPathToYourTemplateFile>' # Get the path via a right-click on the template file in VSCode & select 'Copy Path'
    Location                         = '<LocationOfYourChoice>' # E.g. WestEurope
    Verbose                          = $true
    resourceGroupName                = '<NameOfTheResourceGroup>' # E.g. workload-rg
    storageAccountName               = '<NameOfTheStorageAccount>' # Must be globally unique
    keyVaultName                     = '<NameOfTheKeyVault>' # Must be globally unique
    logAnalyticsWorkspaceName        = '<NameOfTheLogAnalyticsWorkspace>' # E.g. carml-law
    applicationInsightsWorkspaceName = '<NameOfTheApplicationInsightsWorkspace>'
    machineLearningWorkspaceName     = '<NameOfTheMachineLearningWorkspace>'
    roleAssignments                  = @(
        @{
            roleDefinitionIdOrName = '<ARoleToAssign>' # E.g. Reader
            principalIds = @('<APrincipalObjectId>') # The one you copied from Azure AD
        }
    )
}
-
Now execute the deployment again
New-AzSubscriptionDeployment @inputObject
-
At last, you can check in the Azure portal if the template deployed what you expected to.
You can further simplify your module my moving certain metadata into a bicepconfig.json file. For our purposes we can use it to create a shorter module reference. To do so, please perform the following steps:
-
In the
workloadfolder hosting your template, create a new file calledbicepconfig.json, paste the following content into it, and replace the<YourRegistry>token with the name of your container registry:{ "moduleAliases": { "br": { "modules": { "registry": "<YourRegistry>.azurecr.io", // Replace "modulePath": "bicep/modules" } } } } -
Back inside the template, you can now shorten all of your container references like the following:
// Before
module mlw 'br:yxlsxxazacrx001.azurecr.io/bicep/modules/microsoft.machinelearningservices.workspaces:0.1.760' = {}

// After
module mlw 'br/modules:microsoft.machinelearningservices.workspaces:0.1.760' = {}
If ready, proceed to the next lab: Lab 9 - Interoperability
This wiki is being actively developed