-
Notifications
You must be signed in to change notification settings - Fork 0
v0.4.0 Lab 2 Setup environment
In this lab, you will set up CARML in your own environment. This set-up can be used to mimic the module factory you can use at your customer, or to perform end to end testing for contribution purposes.
- Step 1 - Create Azure Service Principal and Configure Access to Subscription
- Step 2 - Create your fork
- Step 3 - Configure your repository
- Step 4 - Configure code base
- Step 5 - Create a branch
- Step 6 - Enable actions
CARML tests the deployments and stores the module artifacts in an Azure subscription. To do so, it requires a service principal with access to it.
This step will guide you in the creation of the Service Principal and the gathering of the required values that will be used in the next steps.
For this lab, it is enough to just write them temporarily in for example Notepad. You should have notes for the following pieces:
- Application (Client) ID
- Service Principal Object ID (not the object ID of the application)
- Service Principal Secret (password)
- Tenant ID
- Subscription ID
- Parent Management Group
There are two alternatives to execute this step. Please, choose the one you prefer and move to Step 2 afterwards.
Alternative 1: Via the Az CLI
The following commands will allow us to:
- Login to Azure using Az CLI.
- Create a new Service Principal.
- Assign the Service Principal
Ownerrole at subscription level.
If you don't want to give Owner permissions to the Service Principals other options will be provided as part of the steps.
-
As a first step, in the Azure portal, you have to navigate to your subscription by using for example the search bar on the top.

-
Following, select the subscription you want to grant access to. In the below example it is called
Visual Studio Enterprise Subscription.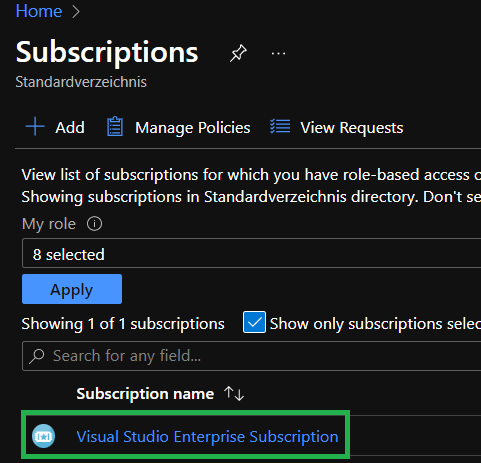
-
This brings you to the overview of your subscription. Here you need to perform 2 tasks:
- Make note of the
Subscription IDfor later reference - Make note of the
Parent Management Groupfor later reference

- Make note of the
-
Navigate back to your local Visual Studio Code and select the PowerShell
Terminalthat should be open on the lower end of VSCode. IfTerminalis not in sight, you can alternatively open it by expanding theTerminal-dropdown on the top, and selectingNew Terminal. -
Now, login to Azure by executing:
az login
-
Select the right subscription you want to work in by executing the following command. Update the
<subscription id>with your Subscription Id. This will start an interactive login session opening your default web browser.az account set --subscription "<subscription id>"
-
Create a new Service Principal with
Ownerpermissions at subscription level by executing the following command:az ad sp create-for-rbac --name "<<service-principal-name>>" --role "Owner" --sdk-auth --output "json"
If you don't want to assign Owner, you can also choose Contributor in combination with User Access Administrator. For this second role assignment you will need to execute the following command:
```Powershell
az role assignment create --assignee "<<service-principal-name>>" --role "User Access Administrator"
```
-
The below output will be returned when the service principal has been created. Make sure you copy these values in a Notepad, for instance.
{
    "clientId": "<client_id>",
    "clientSecret": "<client_secret>",
    "subscriptionId": "<subscriptionId>",
    "tenantId": "<tenant_id>",
    (...)
}
Note: Make sure to write these things down as you will need them in the next Lab. Especially the password since it can't be retrieved twice.
-
Lastly, you need to gather the Object Id of the Service Principal you just created. You can do so by executing the following command:
az ad sp list --display-name "<service-principal-name>" --query "[].objectId" --output tsv
Alternative 2: Via the Azure Portal
-
Open the Azure Portal via the URL https://portal.azure.com

-
Navigate to Azure Active Directory (Azure AD) by using for example the search bar on the top.

-
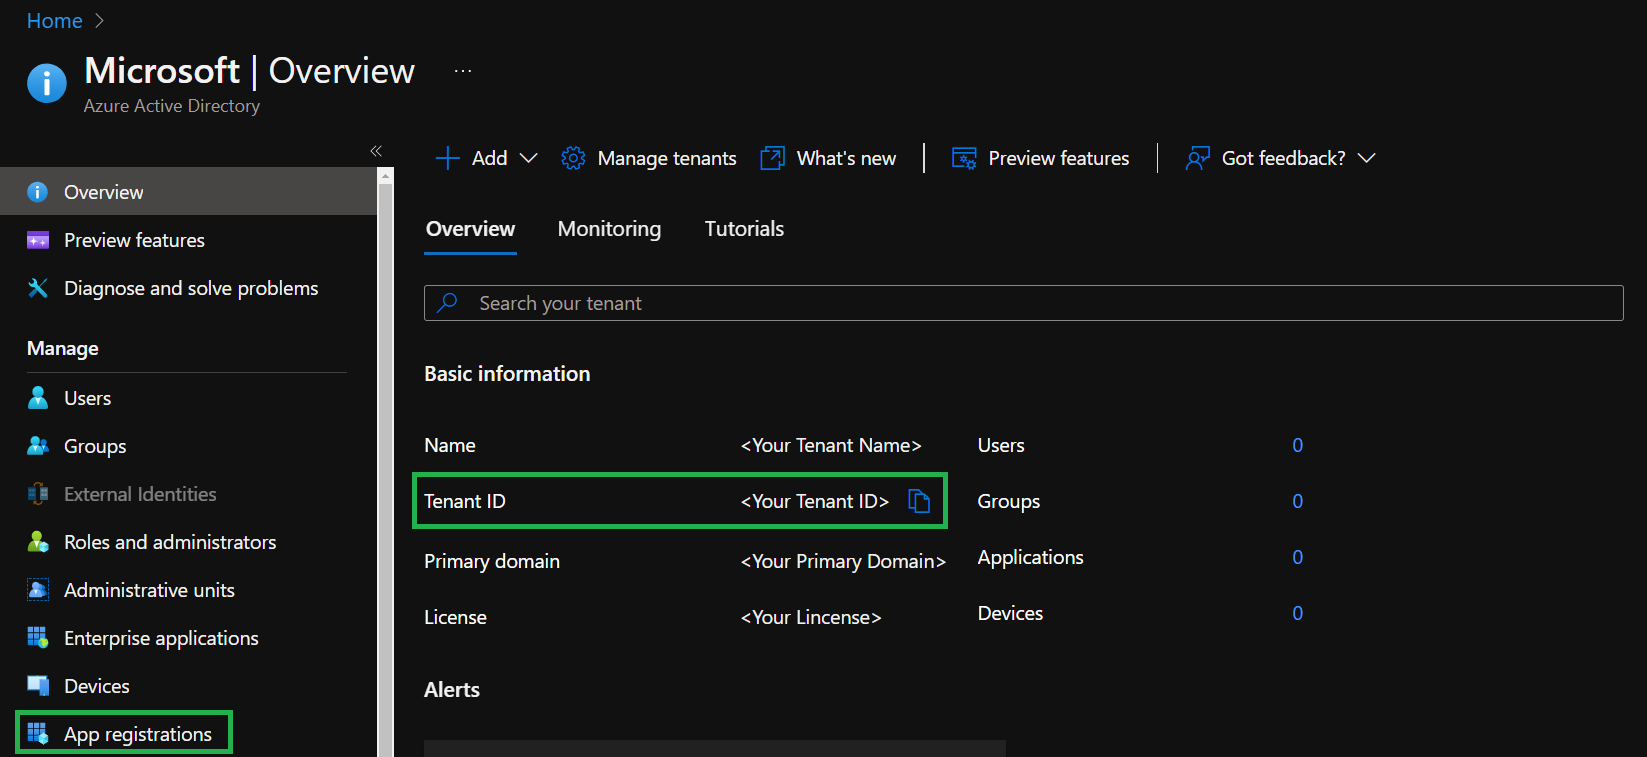
Here we want to do 2 things:
- Make note of your
Tenant IDin the displayedOverviewfor later reference - Further select
App registrationsin the blade to the left
- Make note of your
-
In the opening view select
+ New registrationon the top.
-
In the opening form, please provide a name of your choice and select
Register. All other options can remain as is.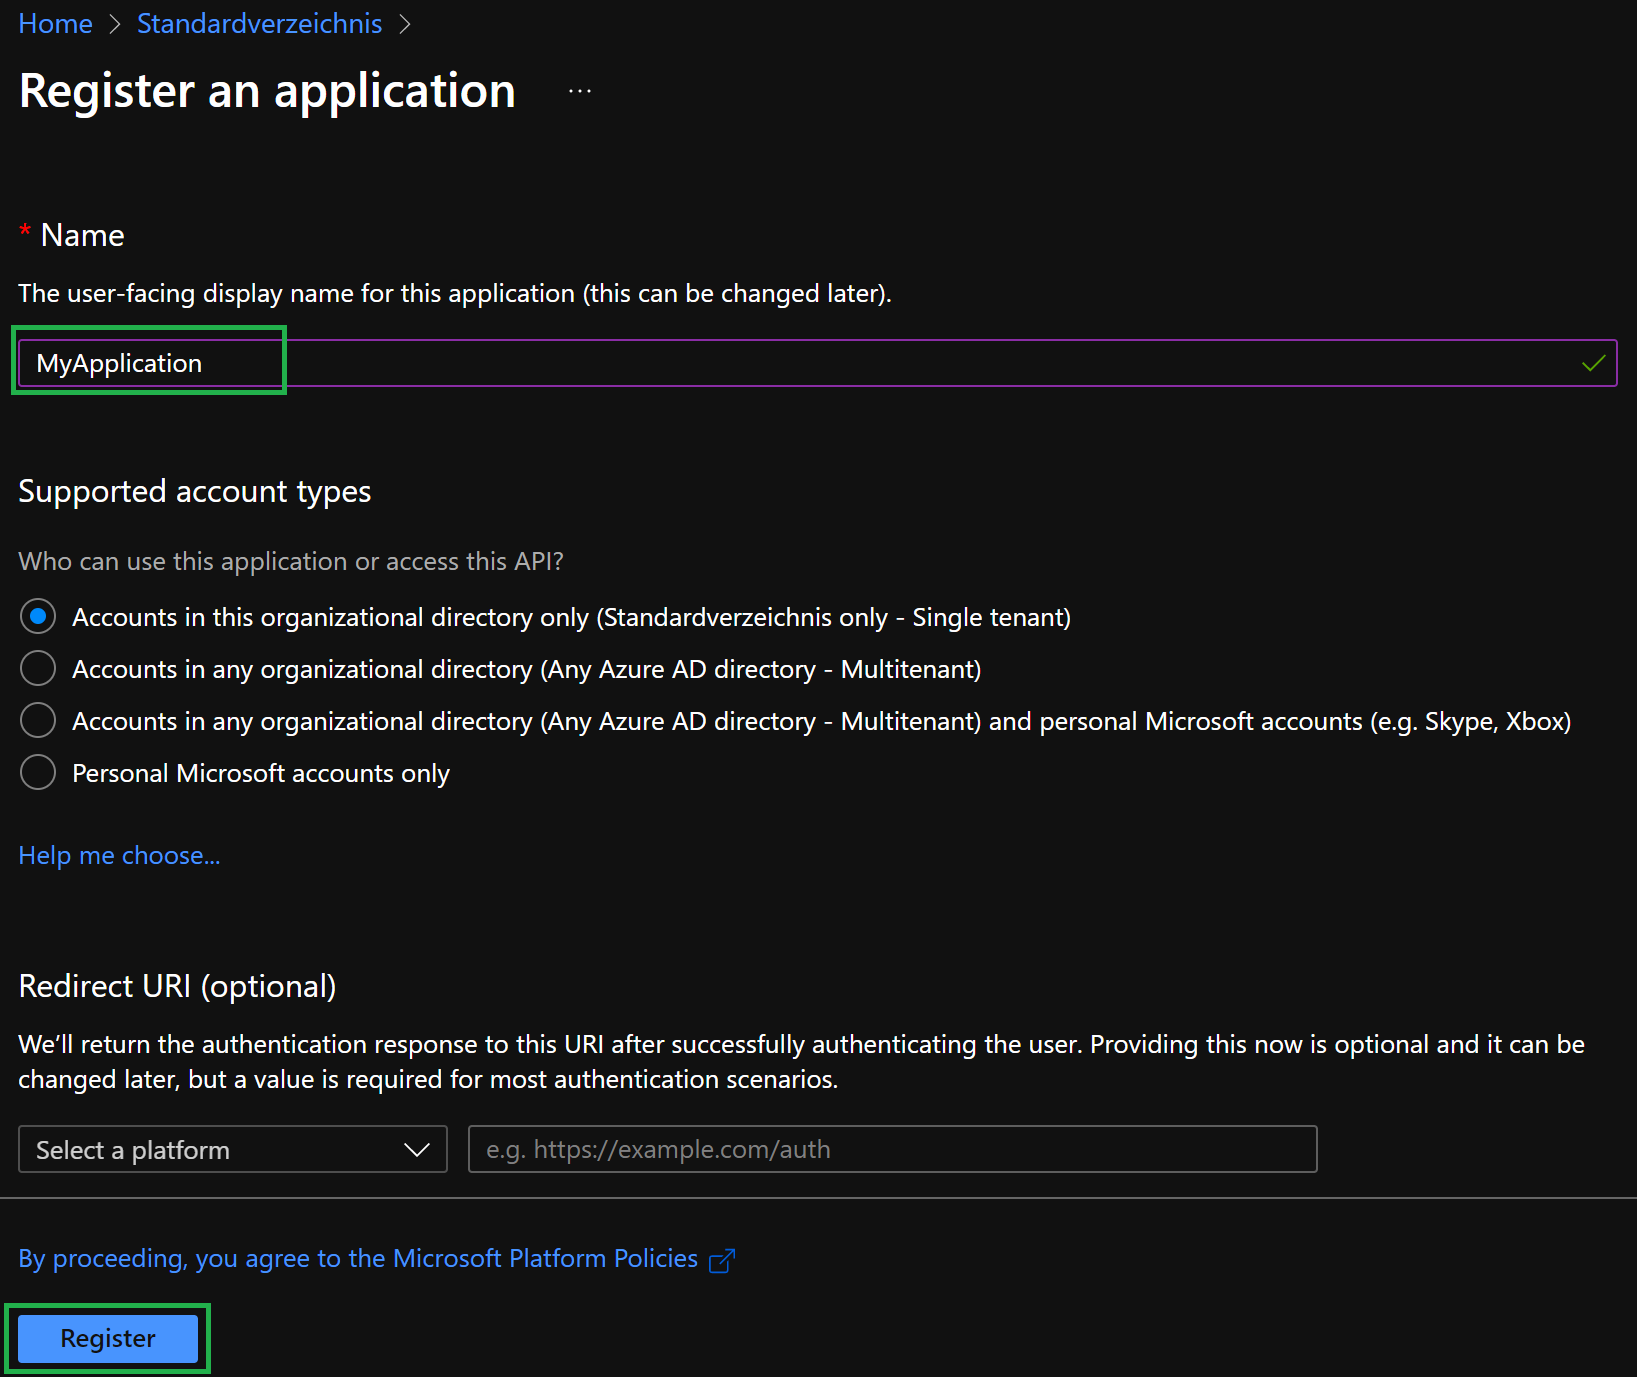
-
This will open the created application's overview. Here we again want to do 2 things:
- Make note of the
Application (client) IDfor later reference - Navigate to the application's underlying service principal by selecting its name on the right side of the application's overview

- Make note of the
-
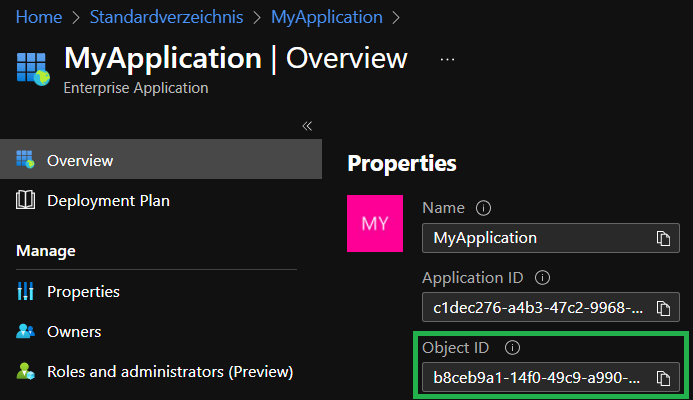
Here you have to perform 2 tasks:
- Make note of the service principal's
Object IDfor later reference - Further, navigate back to the created application's overview by going back in your browser
- Make note of the service principal's
-
Back on the application, you again have to perform 2 tasks:
- Select
Certificates & secretsin the blade to the left - Select
+ New client secretin the opening view to the right
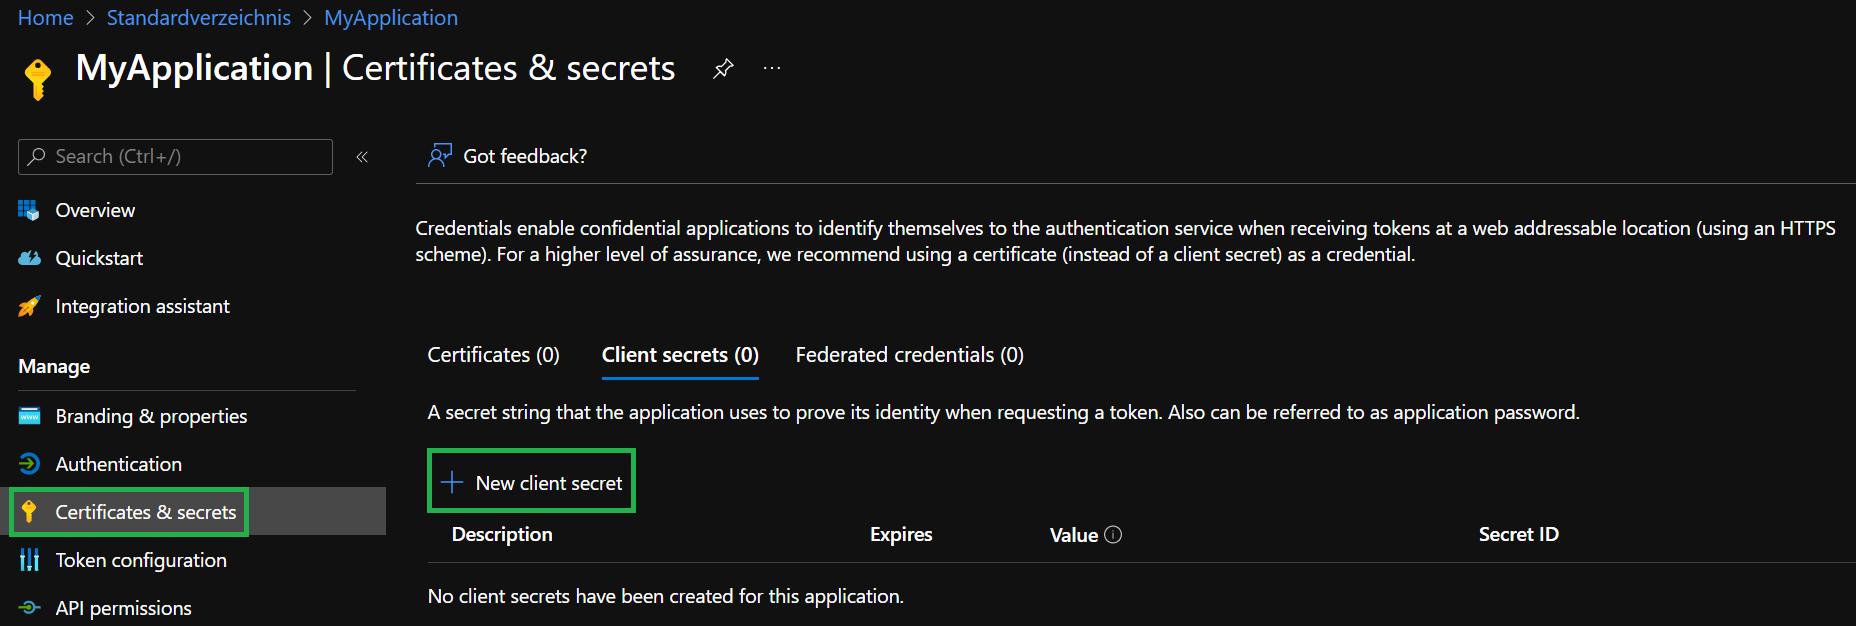
- Select
-
Now enter a name for the secret, and click on
Add.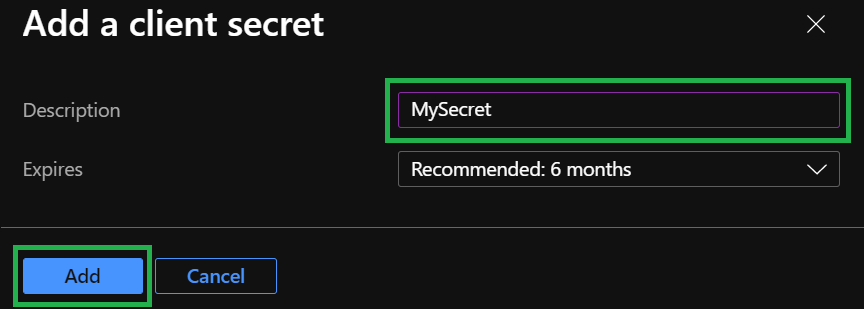
-
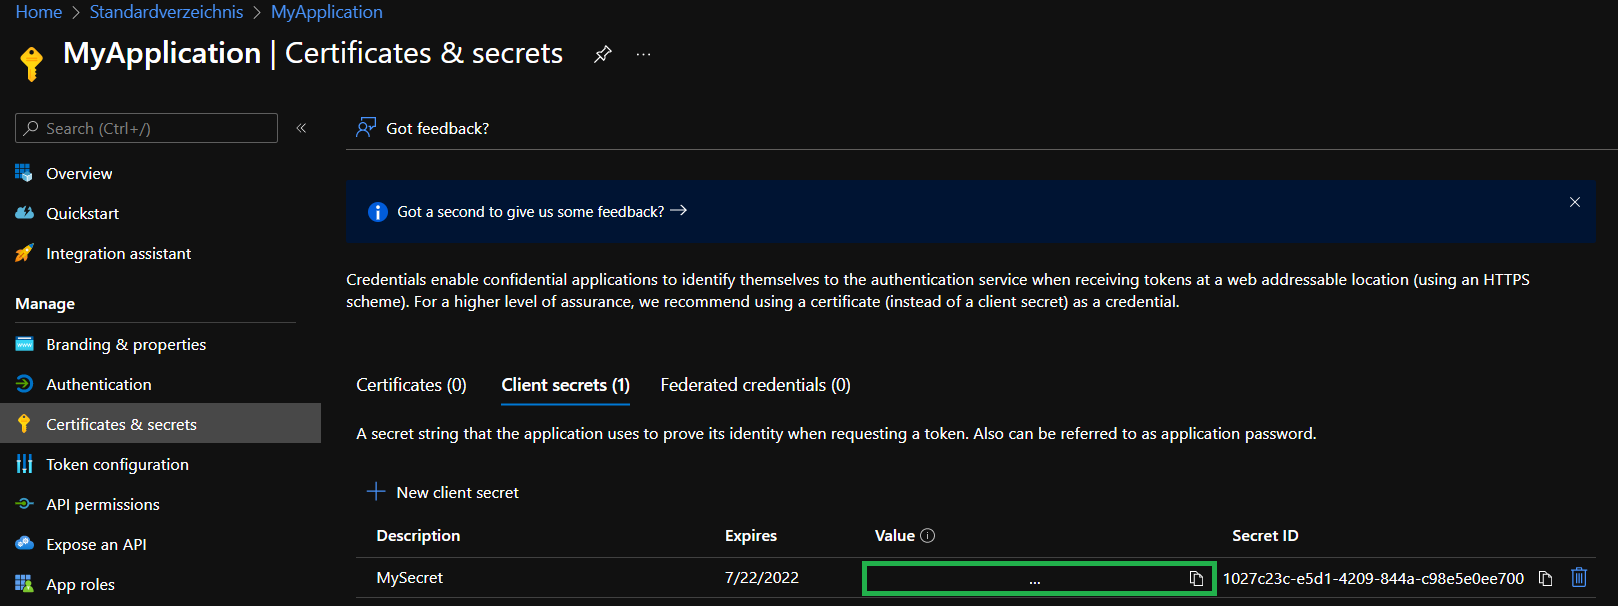
The previous step created a new secret for the application which is shown to us now. Please make note of the secret value as it will only be visible until we leave this view.
Now that we have a new service principal, we must grant it access on the subscription we want to test later deployments in.
-
As a first step, you have to navigate to your subscription by using for example the search bar on the top.

-
Following, select the subscription you want to grant access to. In the below example it is called
Visual Studio Enterprise Subscription.
-
This brings you to the overview of your subscription. Here you need to perform 3 tasks:
- Make note of the
Subscription IDfor later reference - Make note of the
Parent Management Groupfor later reference - Further select
Access control (IAM)in the blade to the left

- Make note of the
-
In the opened
Access control (IAM)view, select+ Addon the top.
-
In the opening drop-down, select
Add role assignment.
-
This opens a new view with 3 tabs we have to navigate through. First, you must select the
Rolewe want to assign. For this lab we recommend to use theOwnerrole, as the CI platform tests both resource deployments, as well as role assignments. If you don't want to assignOwner, you can also chooseContributorin combination withUser Access Administrator. In either case, you can use the search to search for the roles you want to assign and select them in the list below it.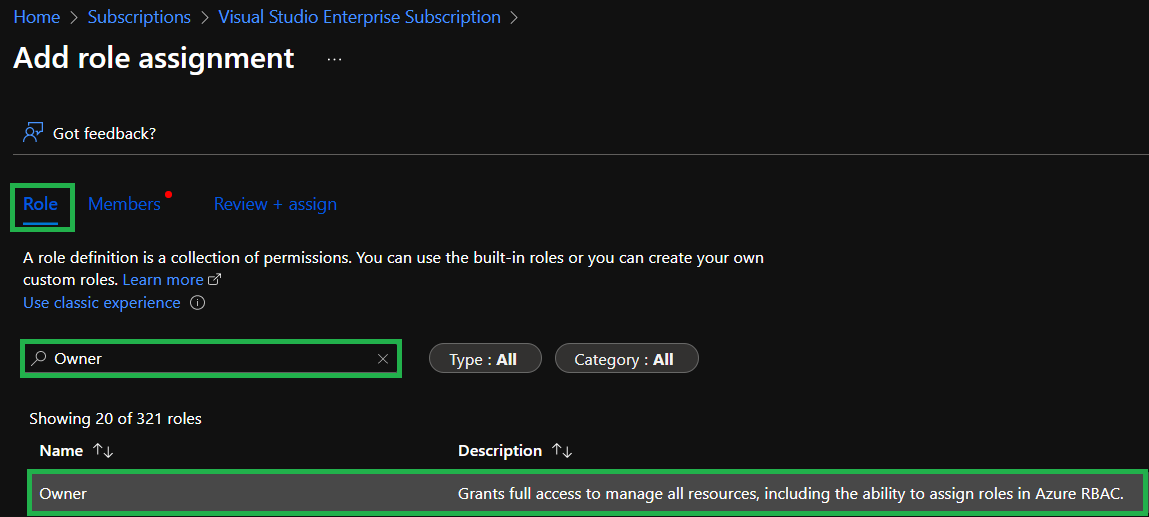
-
Next, navigate to the
Memberstab and click on+ Select members.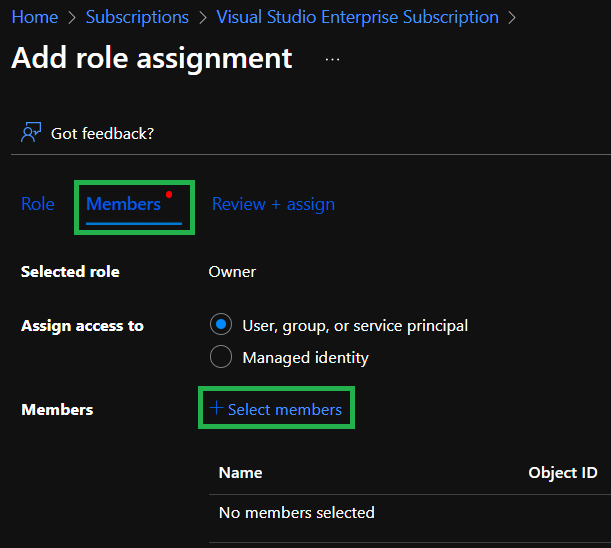
-
In the opening blade, search for the name of the application you created (in this example it is
MyApplication), make sure you select the application, and click onSelecton the bottom of the blade.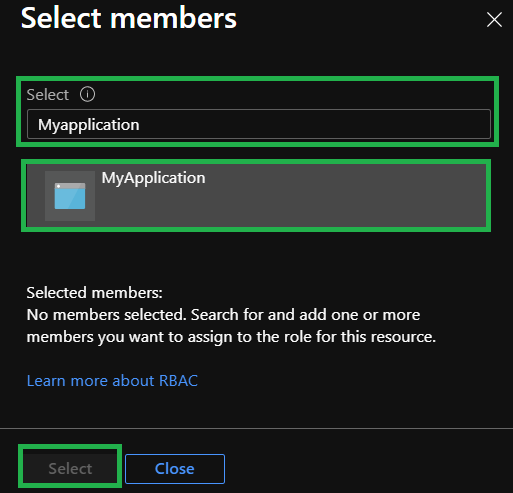
-
This will close the blade and show the application in the
Membersview as shown in the image below.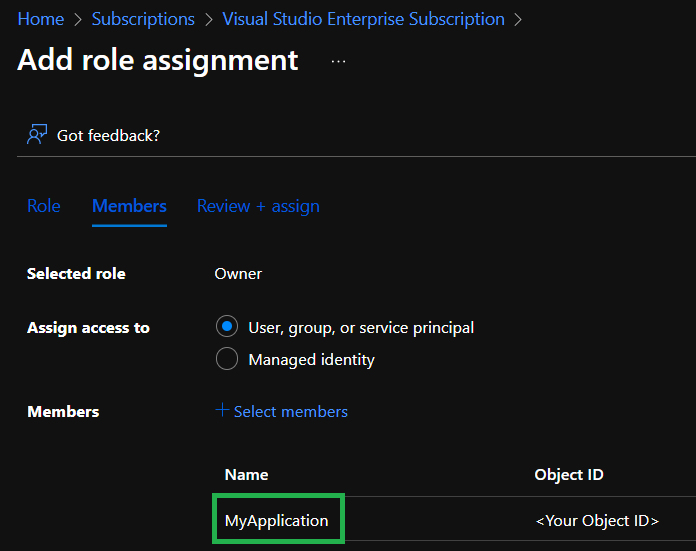
-
Finally, select the
Review + assigntab which shows you an overview of the configuration and click on theReview + assignbutton on the bottom to conclude the role assignment.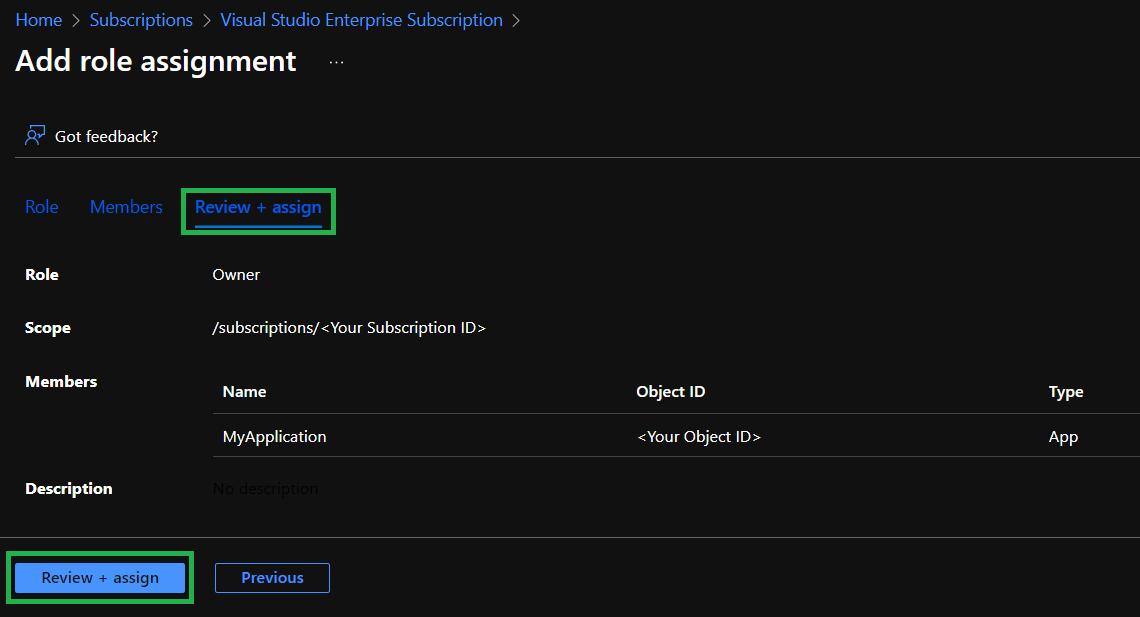
-
This will close the view and we can confirm that the role assignment worked by searching for the application in the search and selecting your application in the
Check accesssection. Be aware that it may take a few seconds for the role assignment to finish.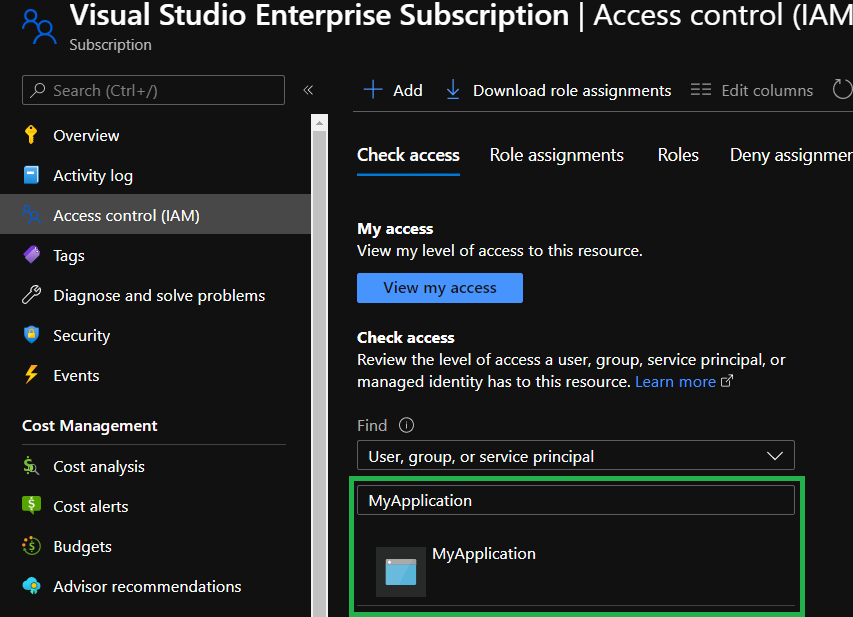
-
In the opening blade you can see that the application indeed is configured with the expected role(s) for the current subscription.

In CARML, you can't work directly in the main branch, so the first action to be taken is to fork the repository.
One of the fundamental features in version control systems, branching and forking are fundamentals to collaboration.
A branch in Git creates another line of development in the project without affecting the main branch.
Fork, on the other hand, is a clone of the repository on a different organization and you can do it even if you don't have contribution rights on the main repo.
-
Open to the repository via the URL aka.ms/CARML

-
Select the
Forkbutton on the top right and select the organization you'd like to fork into. For this lab we recommend to use your own organization as this ensures you will have all the permissions you need.
-
Once triggered, the repository will take a moment to be set up.
-
Once done, you will automatically be forwarded to your repository.

Now you need to configure several secrets that are leveraged by the solution's workflows. Most notably for example, the service connection.
To do that you have to perform the following steps in sequence:
-
Navigate to the repository's
Settings.
-
In the list of settings, expand
Secretsand selectActions. You can create a new repository secret by selectingNew repository secreton the top right.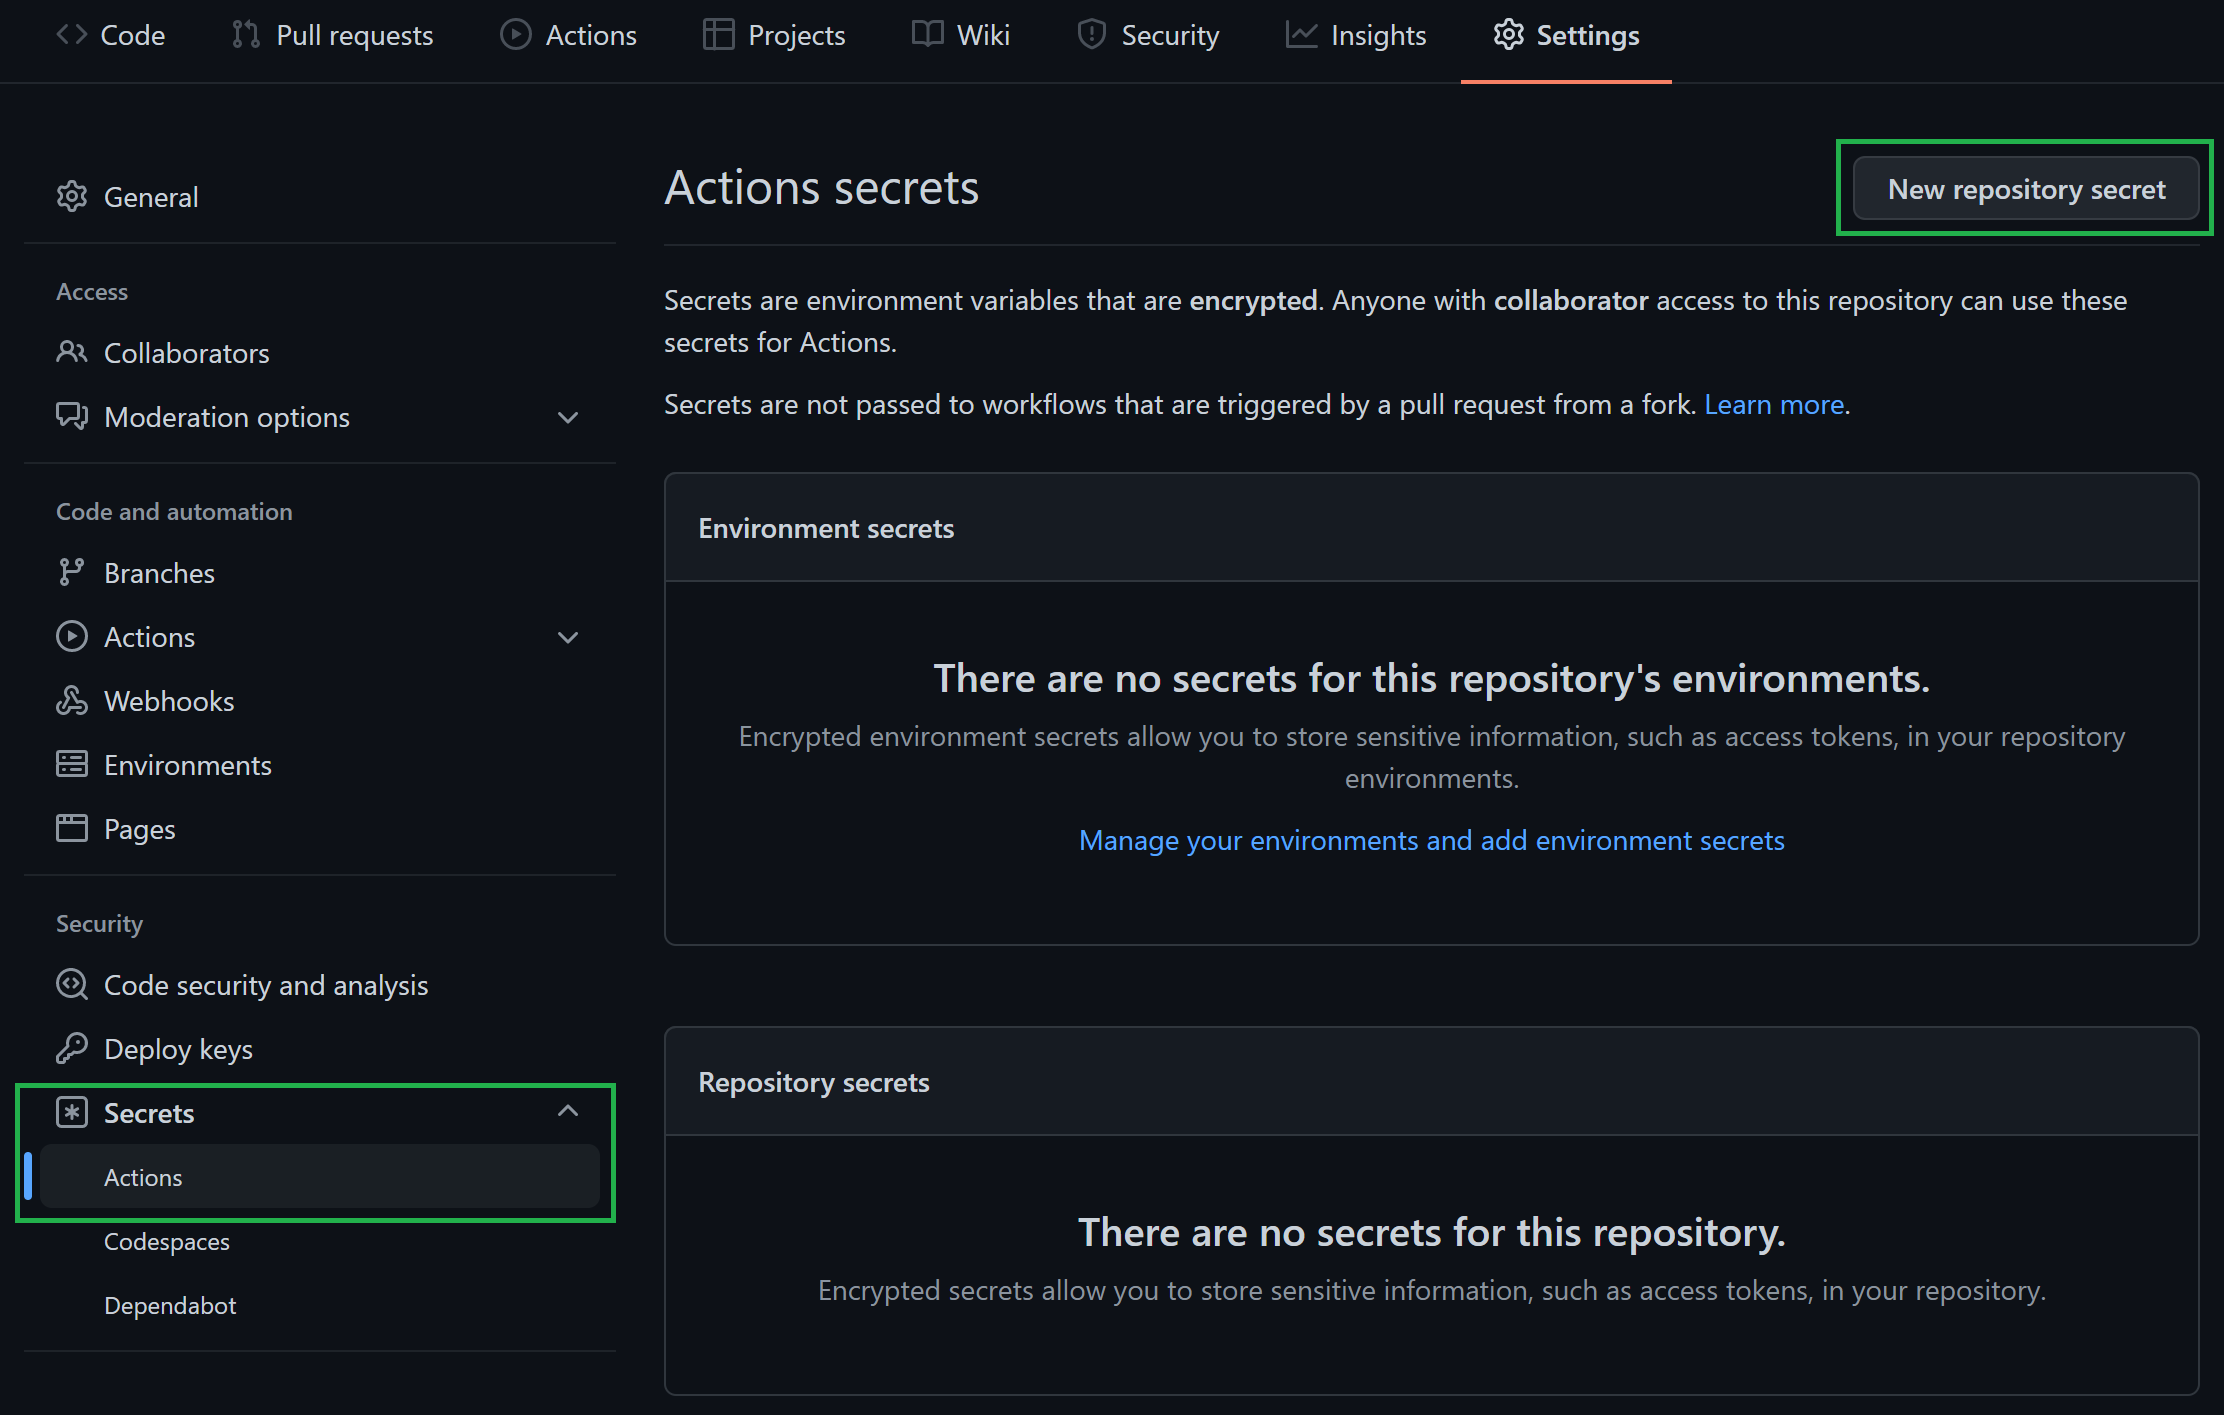
-
In the opening view, you can create a secret by providing a secret
Name, a secretValue, followed by a click on theAdd secretbutton.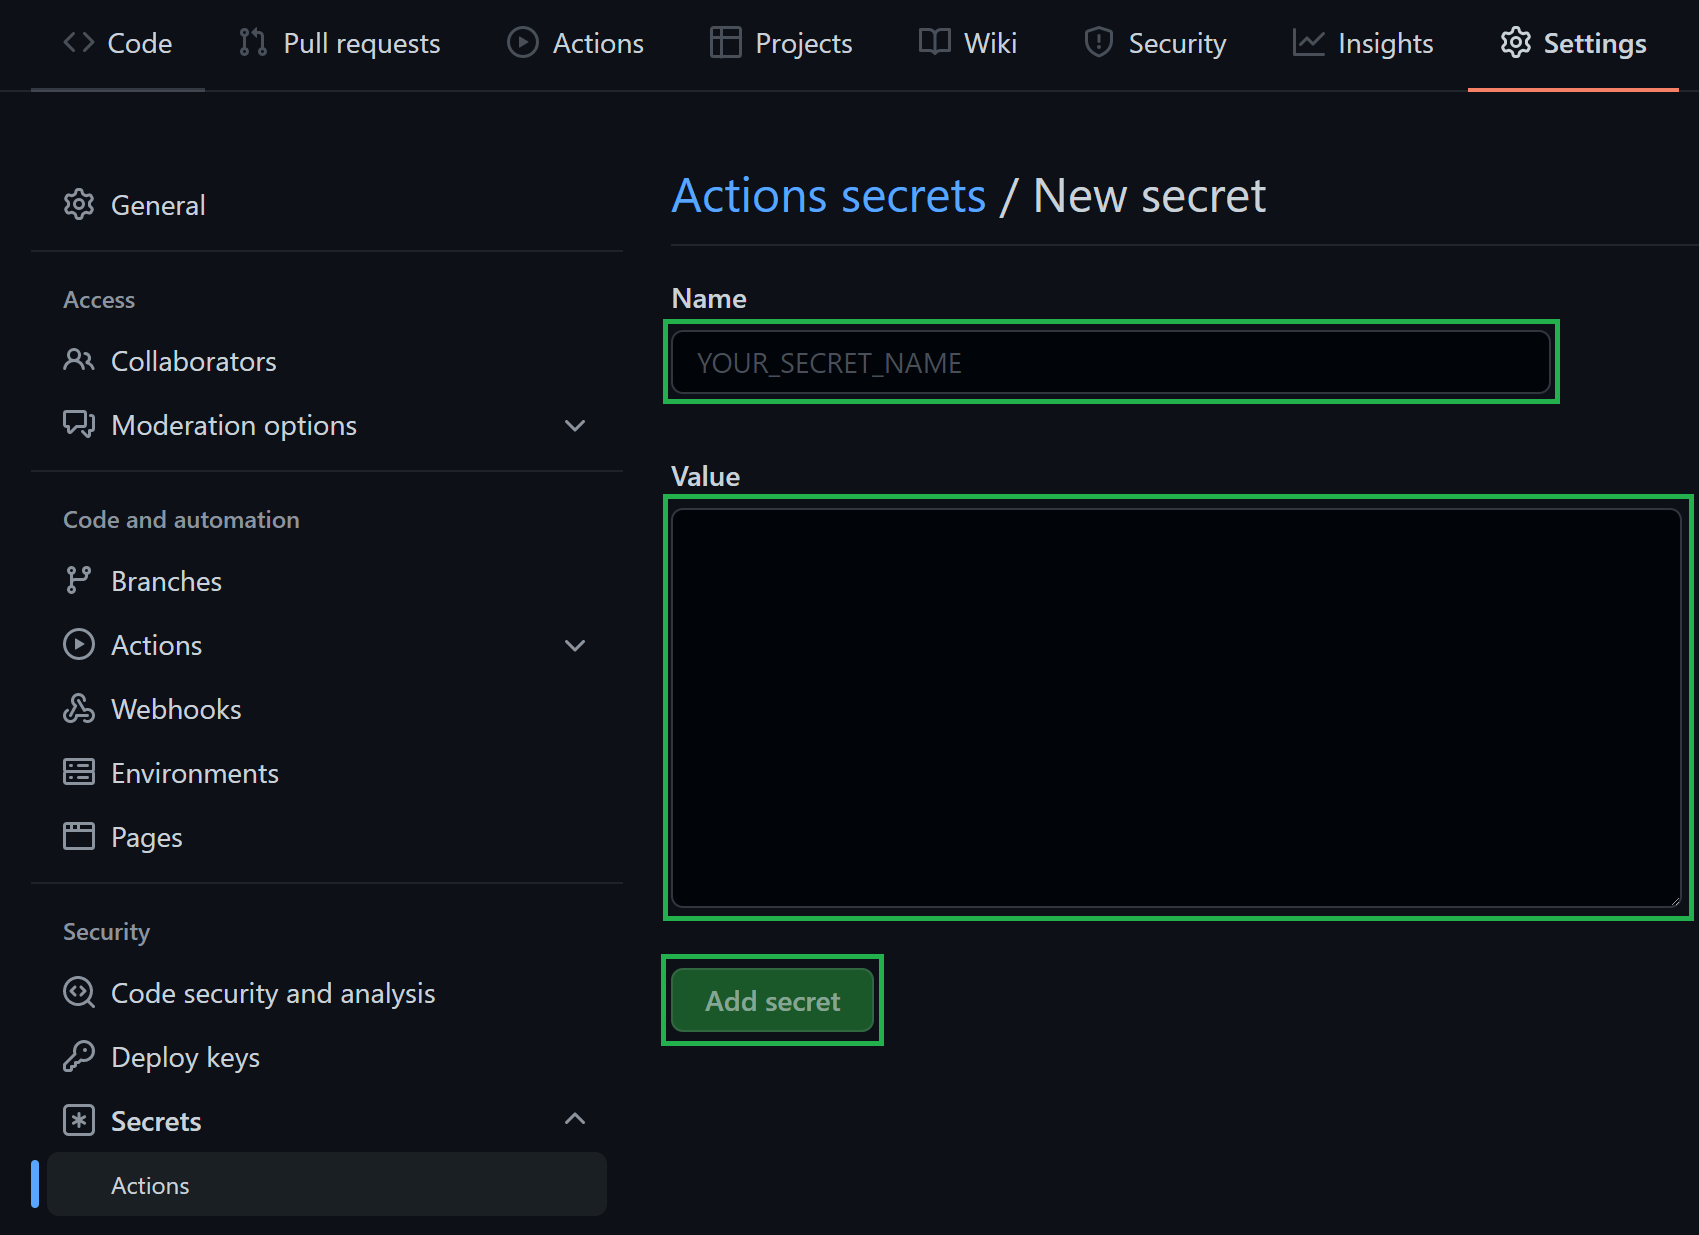
The values of the secrets are the ones we collected in Step 1 of this lab. You'll need to create one secret for each entry in the following table and make sure you use the exact same naming:
Secret Name Example Description ARM_MGMTGROUP_IDde33a0e7-64d9-4a94-8fe9-b018cedf1e05/my-mgThe group ID of the management group to test deploy modules of that level in. ARM_SUBSCRIPTION_IDd0312b25-9160-4550-914f-8738d9b5caf5The subscription ID of the subscription to test deploy modules of that level in. ARM_TENANT_ID9734cec9-4384-445b-bbb6-767e7be6e5ecThe tenant ID of the tenant to test deploy modules of that level in. AZURE_CREDENTIALSSee below See below PLATFORM_REPO_UPDATE_PAT<placeholder>A private access token (PAT) with enough permissions assigned to it to push into the main branch. This PAT is leveraged by pipelines that automatically generate ReadMe files to keep them up to date. TOKEN_NAMEPREFIXcntsoOptional. If you specify the name prefix token here, it is only applied if the localToken_namePrefixspecified in the settings.yml is left empty.-
Special case:
AZURE_CREDENTIALS, This secret represents our service connection to Azure and its value is a compressed JSON object that must match the following format:{"clientId": "<client_id>", "clientSecret": "<client_secret>", "subscriptionId": "<subscriptionId>", "tenantId": "<tenant_id>" }Make sure you create this object as one continuous string as shown above - using the information you collected during Step 1 of this lab. Failing to format the secret as above, results in masked strings (
***) in place of{and}in the workflow logs as it is considering each line of the json object as a separate secret string. If you're interested, you can find more information about this object here.
-
To perform these changes as quickly and easily as possible, we recommend to update the code base using a local clone of the code in Visual Studio Code (VSCode). To do so, please perform the following steps:
-
On the overview page of your fork, select the
<> Codebutton to the right, and select the copy button in the opening pop up to copy the URL we need to clone the repository.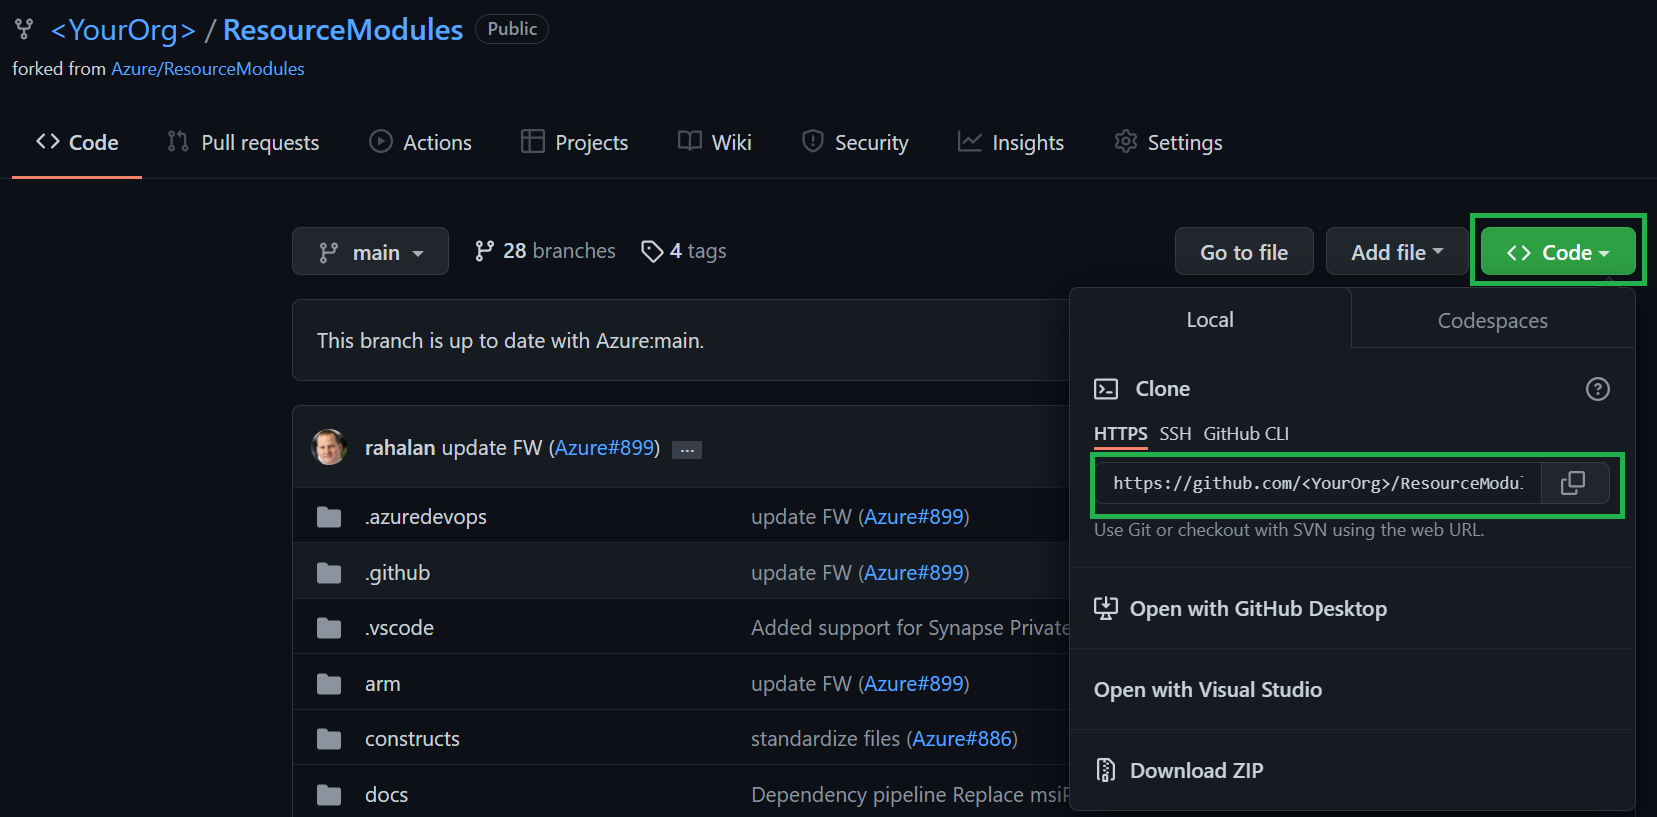
-
On your local machine you can clone the repository to any location you desire. However, it is recommended to keep the local file paths short.
Example:
C:/dev/CARML/lab
There are different ways you can achieve this:
Alternative 1: Using VSCode
-
Open Visual Studio Code and further navigate to the Terminal. If a Terminal is not in sight, you can alternatively open it by expanding the
Terminal-dropdown on the top, and selectingNew Terminal -
In the Terminal, type
cd <Path>, and replace<Path>with the local file path you'd like to clone your fork to (for examplecd 'C:/dev/CARML/lab') -
Next, type
git clone '<URL>', replace<URL>with the URL you copied before and confirm the execution. -
Following the execution you can now open the downloaded clone via the file explorer on the top left
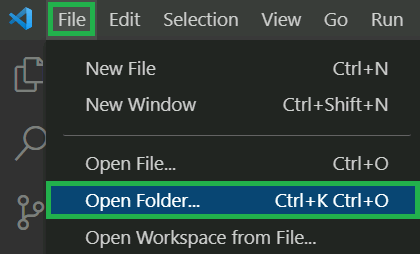
-
Navigate to the extracted folder, select it and trigger the
Select Folderbutton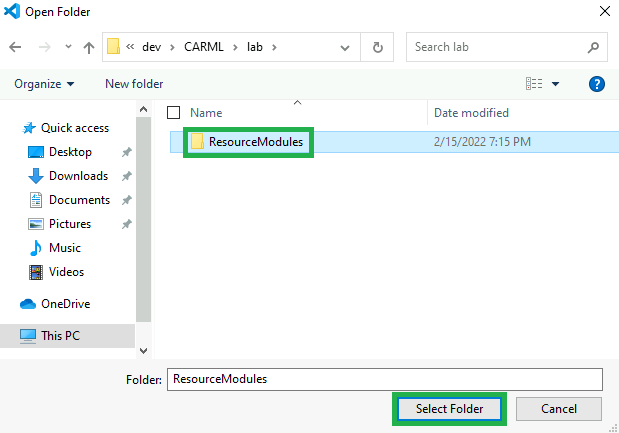
Alternative 2: Using the Terminal
-
In the folder you chose, perform a right-click and select
Open in Windows Terminalto open a new PowerShell session with the path set to the current folder.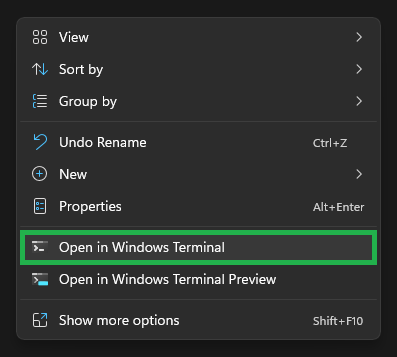
-
In the Terminal type
git clone '<URL>', replace<URL>with the URL you copied before and confirm the execution.
-
Following the execution you will find that there is now a
ResourceModulesfolder.
-
Next, back in the Terminal, execute the command
code ./ResourceModulesto open Visual Studio Code in the clone repository folder.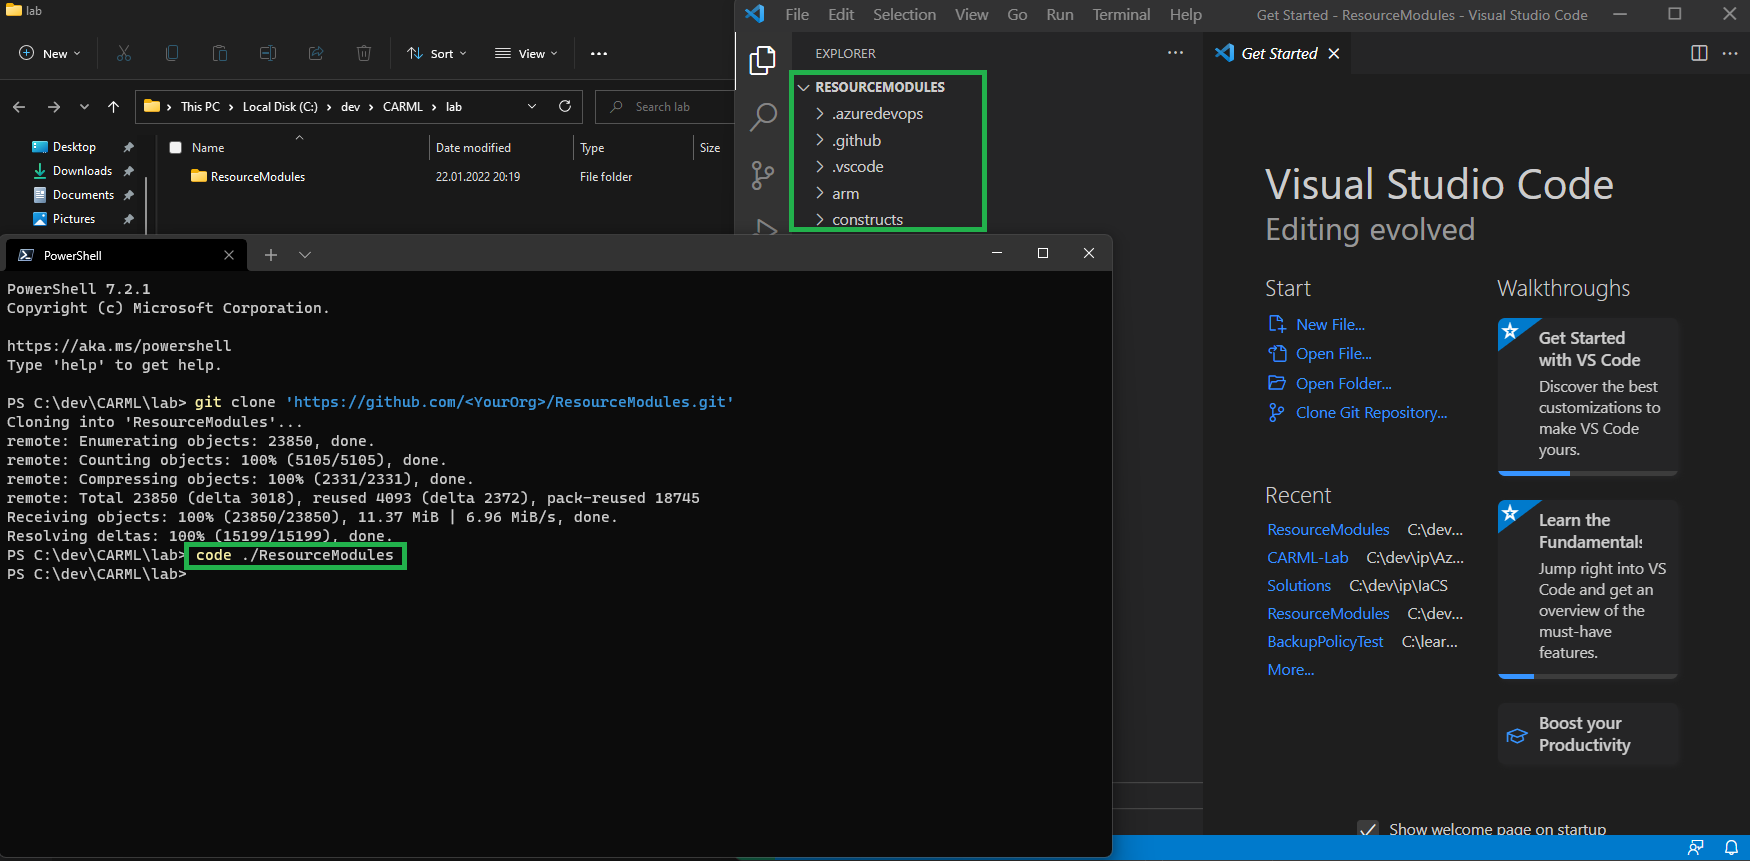
-
To lower the barrier to entry and allow users to easily define their own naming conventions, we introduced a default "name prefix" for all deployed resources.
Each pipeline in CARML that deploys resources uses a logic that automatically replaces "tokens" (i.e. placeholders) in any module test file. Tokens are stored in only a few central locations to facilitate maintenance (e.g., local settings.yml, repository secrets or variable groups)..
To update the namePrefix, perform the following steps:
-
Open the
settings.ymlfile in the repository's root directory. -
Replace the value of the
localToken_namePrefixwith a different value:localToken_namePrefix: 'cntso'
NOTE: The value should be a 3-5 character long string like
cntso. Longer strings are not recommended as they may conflict with Azure resource name length restrictions.NOTE: The CI pipelines automatically removes the localToken_ prefix from the name when processing the tokens replacement.
You now need to push the changes in the repo. You can do this in two ways:
Alternative 1: Via VSCode's terminal
-
If a Terminal is not in sight, you can alternatively open it by expanding the
Terminal-dropdown on the top, and selectingNew Terminal -
Now, execute the following PowerShell commands:
git add .
git commit -m 'Update settings'
git push
Alternative 2: Via VSCode's UI
-
Add your changes: If not already there, navigate to the source control menu to the left and add the changed files to the commit. To do so, select the
+icon next to thesettings.ymlfile
-
Commit your changes: Next, you should give the commit a meaningful message such as 'Update settings' and can then click the checkmark symbol on the top to create the commit

-
Push your changes: Finally, you can push the changes to the repository by selecting the blue
Sync Changesbutton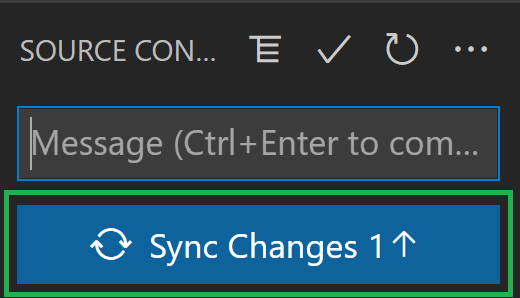
Forgot to configure git?
If you get an issue regarding configuring git user name and email, run the following commands with your info:
git config --global user.name "John Doe"
git config --global user.email "johndoe@example.com"
By default, CARML uses pipeline triggers to automate for example the publishing of a new module once a corresponding PR is merged.
To this end, the trigger is set up to look for any changes in the main branch if any module or pipeline file was modified.
As you don't want to accidentally trigger any pipelines, you should hence create a branch to perform your tasks on throughout the rest of the lab.
You can do this in one of two ways:
Alternative 1: Via VSCode's terminal
-
If a Terminal is not in sight, you can alternatively open it by expanding the
Terminal-dropdown on the top, and selectingNew Terminal -
Now, execute the following PowerShell commands:
git checkout -b 'carmlLab'
git push --set-upstream 'origin' 'carmlLab'
Alternative 2: Via VSCode's UI
-
Select the current branch on the bottom left of VSCode
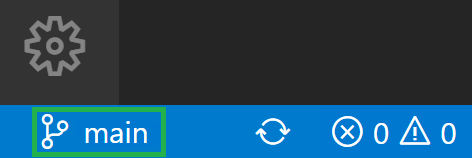
-
Select
+ Create new branchin the opening dropdown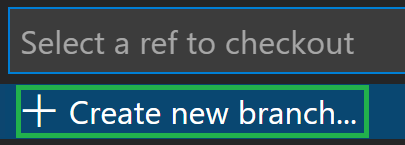
-
Enter the new branch name
carmlLab
-
Push the new branch to your GitHub fork by selecting
Publish Branchto the left in the 'Source Control' tab
Finally, the 'GitHub Actions' are disabled by default. Hence, in order to continue with the rest of the lab and execute any pipelines you have to enable them first.
To do so, perform the following steps:
-
Navigate to the
Actionstab on the top of the repository page.
-
Next, select '
I understand my workflows, go ahead and enable them'.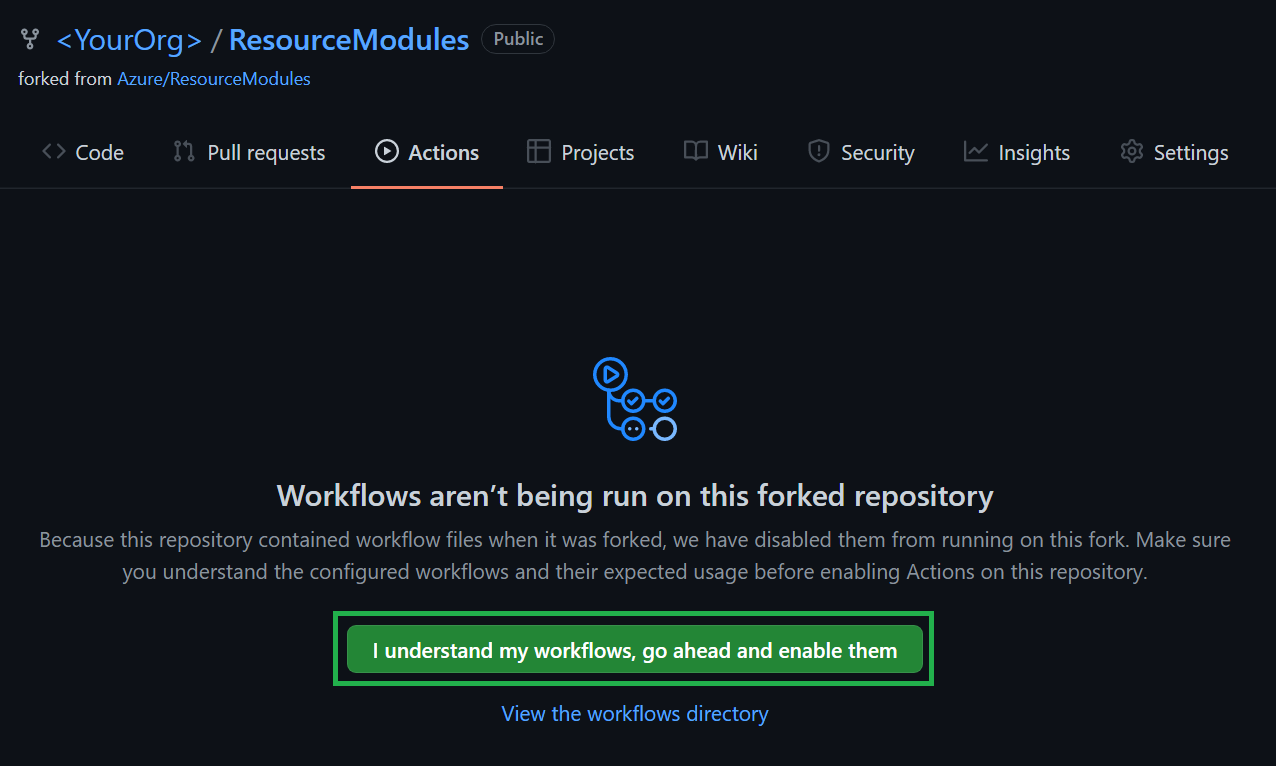
Check name-prefix availability snippet
To check the availability of the name-prefix please copy and paste the below snippet into a PowerShell window and provide a name for the requested namePrefix parameter.
function Test-NamePrefixAvailability {

    param(
        [Parameter(Mandatory = $true)]
        [string] $namePrefix
    )

    if(-not (Get-AzContext)) {
      Write-Warning "In order to execute this function you must be logged into Azure. Initiating..."
      Connect-AzAccount
    }

    $prefixAvailable = $true

    # Build names
    $storageAccountNames = @(
      ('adp{0}azsafa001' -f $namePrefix),
      ('{0}azsax001' -f $namePrefix)
    )
    $keyVaultNames = @(
      ('adp-{0}-az-kv-x-001' -f $namePrefix),
      ('{0}-az-kvlt-x-001' -f $namePrefix)
    )
    $acrNames = @(
      ('adp{0}azacrx001' -f $namePrefix)
    )

    # $accessToken = Get-AzAccessToken

    $subscriptionId = (Get-AzContext).Subscription.Id

    # Storage
    Write-Host "`nCheck Storage Accounts" -ForegroundColor 'Cyan'
    Write-Host '======================' -ForegroundColor 'Cyan'
    foreach ($storageAccountName in $storageAccountNames) {
        $path = '/subscriptions/{0}/providers/Microsoft.Storage/checkNameAvailability?api-version=2021-04-01' -f $subscriptionId
        $requestInputObject = @{
            Method  = 'POST'
            Path    = $path
            Payload = @{
                name = $storageAccountName
                type = 'Microsoft.Storage/storageAccounts'
            } | ConvertTo-Json
        }
        $response = ((Invoke-AzRestMethod @requestInputObject).Content | ConvertFrom-Json)
        if ($response.nameAvailable) { Write-Host "=> The storage account name [$storageAccountName] is currently available" -ForegroundColor 'Green' }
        else {
            Write-Warning "=> Warning: The storage account name [$storageAccountName] is not available. Please try a different prefix."
            $prefixAvailable = $false
        }
    }

    # Key Vault
    Write-Host "`nChecking Key Vaults" -ForegroundColor 'Cyan'
    Write-Host '===================' -ForegroundColor 'Cyan'
    foreach ($keyVaultName in $keyVaultNames) {
        $path = '/subscriptions/{0}/providers/Microsoft.KeyVault/checkNameAvailability?api-version=2021-10-01' -f $subscriptionId
        $requestInputObject = @{
            Method  = 'POST'
            Path    = $path
            Payload = @{
                name = $keyVaultName
                type = 'Microsoft.KeyVault/vaults'
            } | ConvertTo-Json
        }
        $response = ((Invoke-AzRestMethod @requestInputObject).Content | ConvertFrom-Json)
        if ($response.nameAvailable) { Write-Host "=> The key vault name [$keyVaultName] is currently available" -ForegroundColor 'Green' }
        else {
            Write-Warning "=> Warning: The key vault name [$keyVaultName] is not available. Please try a different prefix."
            $prefixAvailable = $false
        }
    }

    # Azure Container Registry
    Write-Host "`nCheck Azure Container Registies" -ForegroundColor 'Cyan'
    Write-Host '==============================' -ForegroundColor 'Cyan'
    foreach ($acrName in $acrNames) {
        $path = '/subscriptions/{0}/providers/Microsoft.ContainerRegistry/checkNameAvailability?api-version=2019-05-01' -f $subscriptionId
        $requestInputObject = @{
            Method  = 'POST'
            Path    = $path
            Payload = @{
                name = $acrName
                type = 'Microsoft.ContainerRegistry/registries'
            } | ConvertTo-Json
        }
        $response = ((Invoke-AzRestMethod @requestInputObject).Content | ConvertFrom-Json)
        if ($response.nameAvailable) { Write-Host "=> The Azure container registry name [$acrName] is currently available" -ForegroundColor 'Green' }
        else {
            Write-Warning "=> Warning: The Azure container registry name [$acrName] is not available. Please try a different prefix."
            $prefixAvailable = $false
        }
    }

    Write-Host "`nRESULT" -ForegroundColor 'Cyan'
    Write-Host '======' -ForegroundColor 'Cyan'
    if (-not $prefixAvailable) {
        Write-Error "=> Prefix [$namePrefix] is not available for all resources. Please try a different one."
    }
    else {
        Write-Host "=> Prefix [$namePrefix] is available for all resources." -ForegroundColor 'Green'
    }
}
Test-NamePrefixAvailability
If ready, proceed to the next lab: Lab 3 - Deploy dependencies
This wiki is being actively developed