One's machine learning models' success or failure can be determined by the data one uses for training and deploying them.
In contrast to most annotation tools on the market, medical datasets require unusual file support and a number of features to maintain annotation accountability.
Auxilium can make the difference between creating an innovative model that can power a disruptive solution or solve a painful, expensive problem - versus investing time and resources on a failed experiment.
Annotating a medical image is not much different from annotating a regular PNG or JPEG if your goal is to train machine learning models. Here are a few differences between medical imaging and other vision data, such as:
Medical-imaging contains transparencies. Therefore, occlusions must be treated differently. Objects in front of each other may appear behind one another. It is well known that artificial intelligence fails to handle occlusion well simply because it lacks presence of mind, and transparent objects can be even worse.
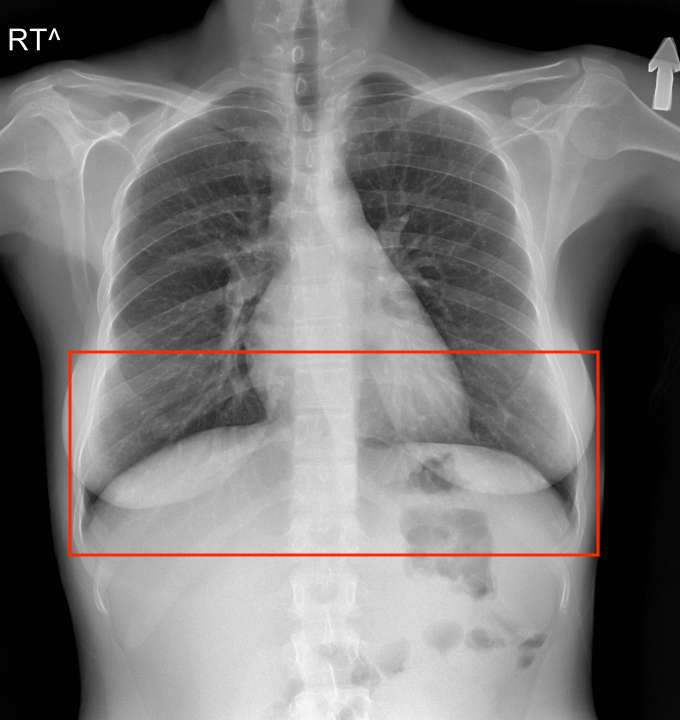
Here is an x-ray of the chest: where are the lungs? They are both over the diaphragm. The occluded part of the lungs cannot be seen manually, but a deep neural network can easily learn where it is.
On this chest x-ray, you see the lower portion of the lungs, which extends anteriorly and posteriorly in front of the diaphragm.
The vast majority of medical imaging will be in DICOM) format. A DICOM file represents a case, which may contain one or more images.
It's not necessary to use DICOM files for AI research since the DICOM file will be converted to another lossless image format during training. It is nonetheless important to preserve the image integrity for the annotation phase, especially since radiologists are familiar with the functionality of DICOM viewers after years of using them.
When constructing your machine learning dataset, it's important not to include unusable data. If a view such as the one above is useful for reference purposes, but cannot be labelled into training data, then it's best to discard it.
Adjusting brightness & contrast, zooming, inverting, and panning of the image are available to the viewer.
In addition to providing annotation tools for marking images with rectangles and length measurements, the annotations also provide some metadata for these annotations, such as their bounding boxes (x,y).
Metadata for annotations can be exported to JSON format for a variety of purposes, such as training input for deep learning models using bounding box algorithms. As well as being able to later restore any annotation state stored in the downloaded JSON files, the JSON files can also be shared with other team members and organizations for collaboration by simply dragging and dropping them onto the viewer.
The experiences of our childhood and the influences of our families shape us as individuals. Both of my parents are doctors, so being surrounded by people who practice medicine has influenced several aspects of my life.
On a daily basis, radiologists mark up medical images, usually with DICOM viewers that include basic annotation tools such as bounding boxes, arrows, and polygons. These labels may sometimes be used by machine learning (ML), but they lack the information that is required for deep learning frameworks such as PyTorch or TensorFlow, or they are in incompatible formats.
I want to empower the people like my parents using computer science and Auxilium is the first step in that direction.
Annotation tools exist for many file formats including PDF and JPEG, but DICOM files present a unique challenge for the healthcare sector. Unlike other formats, this one contains images as well as important metadata identifiers, which give more information about the image or the patient.
In a relatively short period of time, I created this web-based tool and took the first step toward my dreams.
My goal is to get Auxilium out and share it with the public, so medical organizations will be able to try it out. If it's recommended, I would like to continue working on it.
To deploy locally, run the following from the application directory:
$ npm install && ng serveTo perform a new production build, run the following from the application directory:
$ ng build --prod=true --outputPath=dist --baseHref=/Auxilium/The build artifacts will be stored in the /dist directory given as an argument to --outputPath. When complete, be sure to install surge.sh commandline tool:
$ npm install -g surgeFinally, deploy the built webapp using the following:
$ cd dist
$ surge
