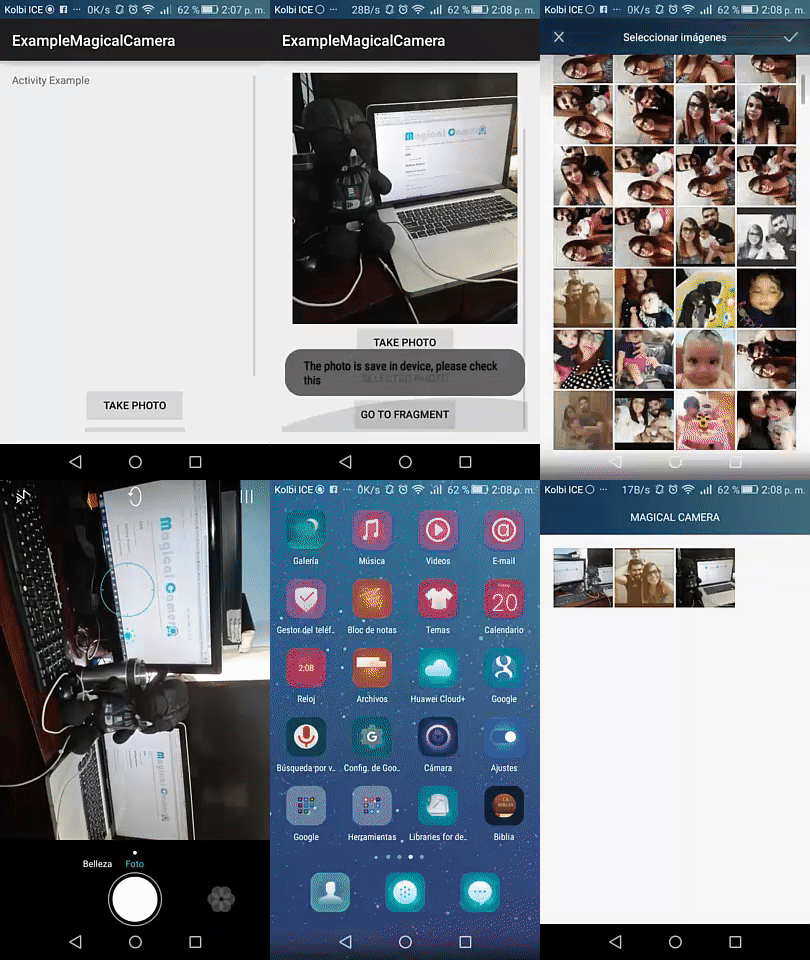
A Magic library to take photos and select pictures in Android. In a simple way and if you need it also save the pictures in device, and facial recognition, get the real uri path or the photo or obtain the private information of the picture.

-
Take picture with camera device.
-
Select pictures in gallery device (read in devices).
-
Write the pictures that you taken in device, in your own directory.
-
Return the path of your photo in device. (This issue is solved for @arthursz)
-
RealTime Permissions Magical camera offers a simple integration of realtime permissions. (This functionallity is created by @cutiko)
-
Working in android 6.0 (We have a class to request the user permission).
-
Create yours standards of name of pictures, or use our standard, like "photoname_YYYYmmddHHmmss"
-
Posibility of shown the private info photography, like latitude, longitude, ISO or others with Exif Class.
-
Posibility of rotate picture when it's required.
-
Select the quality of the photo with a percentage, when 1 is the worst and 100 is the better.
-
Obtain the LandMark and return a bitmap with a facial recognition that you need.
-
Return the BitmapPhoto if you need to save this in internal DB of your application.
-
Convert your bitmap in array bytes or string64, if you need to send by Json or XML.
-
Type of photo formats: PNG, JPEG and WEBP.
- A library completely OpenSource.
- Use best practice in POO
- Minimun SDK 14+ API.
- Support library
- Compile with Gradle
- License Under Apache 2.0
- The easiest possible integration
- Integrate in less than 5 minutes
- Quick and simple API
- A good Internal Documentation
use git (sourcetree or others) Remember Download the example for understand better the process
git clone https://github.com/fabian7593/MagicalCamera.gitDownload from Here
Another type download by Bintray from 
If you need to take photo or select picture, this is your solution. This library give a magical solution for take a picture,write and red in device, return your uri real path and obtain yhe private info of the photo and facial recognition, you only need to download this and integrate this in your project, maybe downloading it or import in your gradle, like this.
repositories {
    jcenter()
}

dependencies {
    compile 'com.frosquivel:magicalcamera:6.0.0'
}
If you have any problem with this dependence, because the library override any styles, colors or others, please change the last line for this code:
 compile('com.frosquivel:magicalcamera:6.0.0@aar') {
        transitive = false;
}You need to import the library
import com.frosquivel.magicalcamera.MagicalCamera;
import com.frosquivel.magicalcamera.Functionallities.PermissionGranted;

//and maybe you need in some ocations
import com.frosquivel.magicalcamera.Objects.MagicalCameraObject;You need to extends MagicalCamera application
public class MyApplicationClass extends MagicalCameraApplication {
    @Override
    public void onCreate() {
        super.onCreate();
    }

    //IF YOU NEED MULTIDEX, SET HERE, NOT ON APPLICATION TAG ON MANIFEAST, LIKE THIS
    @Override
    protected void attachBaseContext(Context base) {
      super.attachBaseContext(base);
      MultiDex.install(this);
    }
}
On manifest, change the name, for the name of your Application class, like this:
  <application
android:name=".MyApplicationClass">With the MagicalPermissions class you can ask for permissions in a Activity or in an Fragment. This class will take care of validating the device API level, what permissions the user haven't granted yet, ask for thoose permissions, deliver the result and together with MagicalCamera will take the photo or select it from the gallery.
Requesting permissions on real time to the user is a 2 part process. First permissions most be requested, then the result is delivered. So you need a field variable to later call it again on the permissions result:
private MagicalPermissions magicalPermissions;
MagicalPermissions constructor accept two params, the first is the Activity or Fragment and the second is a String array of the permissions you need String[]. MagicalPermissions use the Activity or Fragment to later deliver the result of the permission, and the array to ask for thoose permissions.
magicalPermissions = new MagicalPermissions(this, permissions);
Inside MagicalPermissions it will be solved if the API level of the device requiere to ask permissions or not. If permissions must be asked to the user then MagicalPermissions will validate which permissions are already granted and only asked for the needed. This is why is very important you only ask for the permissions you need, taking the photo or selecting it will only happen if every permission you have asked is granted.
- By example, if you only need to take the photo then:
String[] permissions = new String[] {
                Manifest.permission.CAMERA
        };
magicalPermissions = new MagicalPermissions(this, permissions);
- MagicalCamera take care of saving the photo commonly you will need:
String[] permissions = new String[] {
            Manifest.permission.CAMERA,
            Manifest.permission.READ_EXTERNAL_STORAGE,
            Manifest.permission.WRITE_EXTERNAL_STORAGE
    };
magicalPermissions = new MagicalPermissions(this, permissions);
- Or maybe you want to use more potential of MagicalCamera and also ask for location related info, then you need:
String[] permissions = new String[] {
            Manifest.permission.CAMERA,
            Manifest.permission.READ_EXTERNAL_STORAGE,
            Manifest.permission.WRITE_EXTERNAL_STORAGE,
            Manifest.permission.ACCESS_COARSE_LOCATION,
            Manifest.permission.ACCESS_FINE_LOCATION
    };
magicalPermissions = new MagicalPermissions(this, permissions);
You can also ask for other permissions in other places of your app, even unrelated to MagicalCamera using MagicalPermissions separatedly. So if getting location information is not requiered for the photo, but is a plus, you should consider separating thoose permissions from the absolutely needed to your feature. MagicalPermissions use a Runnable to do whatever you want after checking the permissions. When is used along with MagicalCamera you don't have to be aware of that, is automatic, but in this case we are considering asking for other permissions:
String[] location = new String[] {
            Manifest.permission.ACCESS_COARSE_LOCATION,
            Manifest.permission.ACCESS_FINE_LOCATION
    };
locationPermissions = new MagicalPermissions(this, location);


Runnable runnable = new Runnable() {
    @Override
    public void run() {
        //TODO location permissions are granted code here your feature
        Toast.makeText(context, "Thanks for granting location permissions", Toast.LENGTH_LONG).show();
    }
};
locationPermissions.askPermissions(runnable);
Then the second part of the process come into play: receiving the permissions result. You have to always override the onRequestPermissionsResult method in the Activity or Fragment. Inside of it, call your instance of MagicalPermissions and give it the result to the permissionResult() method (this is why must be a field). The permissionResult() method is a Map<String, Boolean> in case you need to know what happened and do something about it:
@Override
public void onRequestPermissionsResult(int requestCode, String[] permissions, int[] grantResults) {
    Map<String, Boolean> map = magicalPermissions.permissionResult(requestCode, permissions, grantResults);
    for (String permission : map.keySet()) {
        Log.d("PERMISSIONS", permission + " was: " + map.get(permission));
    }
    //Following the example you could also
    //locationPermissions(requestCode, permissions, grantResults);
}
( with pixels percentage ) You need to declare and constant or a simple int variable for the quality of the photo, while greater be, greater be the quality, and otherwise, worst be the quality, like this
//The pixel percentage is declare like an percentage of 100, if your value is 50, the photo will have the middle quality of your camera.
// this value could be only 1 to 100.
private int RESIZE_PHOTO_PIXELS_PERCENTAGE = 80;You need to instance the MagicalCamera Class, like this: The fisrt param is the current Activity, and the second the resize percentage photo, and the third param is the Permission Granted
MagicalCamera magicalCamera = new MagicalCamera(this,RESIZE_PHOTO_PIXELS_PERCENTAGE, magicalPermissions);
You need to call the methods for take or select pictures in activities that this form:
//take photo
magicalCamera.takePhoto();

//select picture
magicalCamera.selectedPicture("my_header_name");You need to call these methods for take or select pictures in fragments:
//take photo
magicalCamera.takeFragmentPhoto(FragmentSample.this);

 //select picture
magicalCamera.selectedFragmentPicture(FragmentSample.this, "My Header Example");
As you can see MagicalCamera is working together MagicalPermissions so you don't need to pass a `Runnable` the camera or photo selection will be triggered once permissions are solved.
Remember, you need to override the method onActivityResult in your activity or fragment like this
 @Override
    public void onActivityResult(int requestCode, int resultCode, Intent data) {
        super.onActivityResult(requestCode, resultCode, data);
        //CALL THIS METHOD EVER
        magicalCamera.resultPhoto(requestCode, resultCode, data);

        //this is for rotate picture in this method
        //magicalCamera.resultPhoto(requestCode, resultCode, data, MagicalCamera.ORIENTATION_ROTATE_180);

        //with this form you obtain the bitmap (in this example set this bitmap in image view)
        imageView.setImageBitmap(magicalCamera.getPhoto());

        //if you need save your bitmap in device use this method and return the path if you need this
        //You need to send, the bitmap picture, the photo name, the directory name, the picture type, and autoincrement photo name if           //you need this send true, else you have the posibility or realize your standard name for your pictures.
        String path = magicalCamera.savePhotoInMemoryDevice(magicalCamera.getPhoto(),"myPhotoName","myDirectoryName", MagicalCamera.JPEG, true);

       if(path != null){
           Toast.makeText(MainActivity.this, "The photo is save in device, please check this path: " + path, Toast.LENGTH_SHORT).show();
       }else{
           Toast.makeText(MainActivity.this, "Sorry your photo dont write in devide, please contact with fabian7593@gmail and say this error", Toast.LENGTH_SHORT).show();
       }
}You only could use
magicalCamera.getRealPath()This method save your bitmap in internal memory device or if the internal memory is full this library save in sdcard (if you have anything) This method have a lot of params that you can need to use the library:
- Bitmap: This is the bitmap that you need to save in memory device.
- PhotoName: The name of the photo
- DirectoryName: The name of directory that you need to save the image
- Format: the format of the photo, maybe png, jpeg or webp. Depends of that you need.
- AutoIncrementNameByDate: This variable save the photo with the photo name and the current date and hour. (Only if is true).
For example: myTestMagicalCameraPhoto_20160520131344 -> This is the year 2016, month 5, day 20, hour 13, minute 13 and second 44.
The method:
 public String savePhotoInMemoryDevice(Bitmap bitmap, String photoName, String directoryName,
 Bitmap.CompressFormat format, boolean autoIncrementNameByDate)
Example:
String path = magicalCamera.savePhotoInMemoryDevice(magicalCamera.getPhoto(), "myTestPhotoName", MagicalCamera.JPEG, true);You have any type of formats for save the pictures and the bitmaps. You can use, the static variables of the library MagicalCamera.
 Bitmap.CompressFormat jpeg = MagicalCamera.JPEG;
 Bitmap.CompressFormat png = MagicalCamera.PNG;
Bitmap.CompressFormat webp = MagicalCamera.WEBP;You can resize the photo in any moment with this:
magicalCamera.setResizePhoto(newResizeInteger);The library have any methods to convert the bitmap in other formats that you need. All of this methods are public statics, I mean that you dont have to instance the library for usage this. You need to call the class * ConvertSimpleImage * And the respective params.
- bitmapToBytes: Convert the bitmap to array bytes, only need the bitmap param and the compress format, return array bytes.
- bytesToBitmap: Convert the array bytes to bitmap, only need the array bytes in param, return bitmap.
- bytesToStringBase64: Convert the array bytes to String base 64, only need the array bytes format in param, return String.
- stringBase64ToBytes: Convert string to array bytes, only need the String in param, return array bytes.
Example:
  //convert the bitmap to bytes
  byte[] bytesArray =  ConvertSimpleImage.bitmapToBytes(magicalCamera.getPhoto(), MagicalCamera.PNG);

   //convert the bytes to string 64, with this form is easly to send by web service or store data in DB
   String imageBase64 = ConvertSimpleImage.bytesToStringBase64(bytesArray);

   //if you need to revert the process
   byte[] anotherArrayBytes = ConvertSimpleImage.stringBase64ToBytes(imageBase64);

  //again deserialize the image
Bitmap myImageAgain = ConvertSimpleImage.bytesToBitmap(anotherArrayBytes);You have the posibility of rotate picture because some devices have the camera in landscape, and the picture is shown upside down. If you need to rotate image use in event onActivityResult the method with the last param:
magicalCamera.resultPhoto(requestCode, resultCode, data, MagicalCamera.ORIENTATION_ROTATE_180);or if you rotate manually in another part of code use method:
//rotate any image
Bitmap myImage = magicalCamera.rotatePicture(magicalCamera.getPhoto(),  MagicalCamera.ORIENTATION_ROTATE_90);

//rotate the getPhoto in magicalCamera Object
Bitmap myImage = magicalCamera.rotatePicture(MagicalCamera.ORIENTATION_ROTATE_NORMAL);
You have this posibillities of rotate image:
MagicalCamera.ORIENTATION_ROTATE_NORMAL
MagicalCamera.ORIENTATION_ROTATE_90
MagicalCamera.ORIENTATION_ROTATE_180
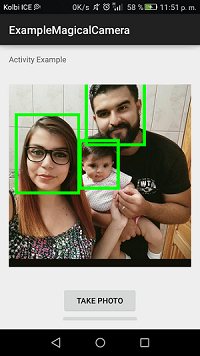
MagicalCamera.ORIENTATION_ROTATE_270This is a method to return your bitmap (magicalCamera.getPhoto()) like another bitmap with a square draws arround the face of the photo, with the posibillity of modify the color and the stroke of the square. And this is not all, you have the posibility of call the List of the photo with facial recognitions, for save data of all faces, for example the distance between eyes, the nose position and mounth position, all of this is important information for facials recognitions.
You need to write for example:
if(magicalCamera != null){
    if(magicalCamera.getPhoto() != null){
         //this comment line is the strok 5 and color red for default
         //imageView.setImageBitmap(magicalCamera.faceDetector());
         //you can the posibility of send the square color and the respective stroke
         imageView.setImageBitmap(magicalCamera.faceDetector(50, Color.GREEN));

         List<Landmark> listMark = magicalCamera.getListLandMarkPhoto();
     }else{
         Toast.makeText(MainActivity.this,
                 "Your image is null, please select or take one",
                 Toast.LENGTH_SHORT).show();
     }
 }else{
     Toast.makeText(MainActivity.this,
             "Please initialized magical camera, maybe in static context for use in all activity",
             Toast.LENGTH_SHORT).show();
 }
The photo and bitmap converted is like to:
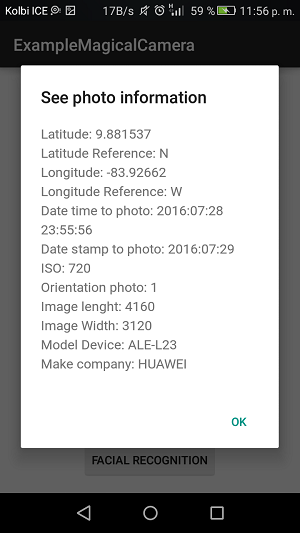
This method show you the private information photo if the photo is saved in device or not... For view all information the device need to activate GPS locations (and maybe internet), else not show all information :(.
You need to write this code for example:
 //verify if the bitmap of image have data
 if(magicalCamera.getPhoto()!=null) {
   //verify if this photo is save in device, and if has private information to show and return true if have information, or false is not
   if(magicalCamera.initImageInformation()) {

         StringBuilder builderInformation = new StringBuilder();

         if (notNullNotFill(magicalCamera.getPrivateInformation().getLatitude() + ""))
             builderInformation.append("Latitude: " + magicalCamera.getPrivateInformation().getLatitude() + "\n");

         if (notNullNotFill(magicalCamera.getPrivateInformation().getLatitudeReference()))
             builderInformation.append("Latitude Reference: " + magicalCamera.getPrivateInformation().getLatitudeReference() + "\n");

         if (notNullNotFill(magicalCamera.getPrivateInformation().getLongitude() + ""))
             builderInformation.append("Longitude: " + magicalCamera.getPrivateInformation().getLongitude() + "\n");

         if (notNullNotFill(magicalCamera.getPrivateInformation().getLongitudeReference()))
             builderInformation.append("Longitude Reference: " + magicalCamera.getPrivateInformation().getLongitudeReference() + "\n");

         if (notNullNotFill(magicalCamera.getPrivateInformation().getDateTimeTakePhoto()))
             builderInformation.append("Date time to photo: " + magicalCamera.getPrivateInformation().getDateTimeTakePhoto() + "\n");

         if (notNullNotFill(magicalCamera.getPrivateInformation().getDateStamp()))
             builderInformation.append("Date stamp to photo: " + magicalCamera.getPrivateInformation().getDateStamp() + "\n");

         if (notNullNotFill(magicalCamera.getPrivateInformation().getIso()))
             builderInformation.append("ISO: " + magicalCamera.getPrivateInformation().getIso() + "\n");

         if (notNullNotFill(magicalCamera.getPrivateInformation().getOrientation()))
             builderInformation.append("Orientation photo: " + magicalCamera.getPrivateInformation().getOrientation() + "\n");

         if (notNullNotFill(magicalCamera.getPrivateInformation().getImageLength()))
             builderInformation.append("Image lenght: " + magicalCamera.getPrivateInformation().getImageLength() + "\n");

         if (notNullNotFill(magicalCamera.getPrivateInformation().getImageWidth()))
             builderInformation.append("Image Width: " + magicalCamera.getPrivateInformation().getImageWidth() + "\n");

         if (notNullNotFill(magicalCamera.getPrivateInformation().getModelDevice()))
             builderInformation.append("Model Device: " + magicalCamera.getPrivateInformation().getModelDevice() + "\n");

         if (notNullNotFill(magicalCamera.getPrivateInformation().getMakeCompany()))
             builderInformation.append("Make company: " + magicalCamera.getPrivateInformation().getMakeCompany() + "\n");

         new MaterialDialog.Builder(MainActivity.this)
                 .title("See photo information")
                 .content(builderInformation.toString())
                 .positiveText("ok")
                 .show();
   }else{
   Toast.makeText(MainActivity.this,
           "This photo donte have ifnormation, remember, for obtain the info you need to save the picture in device before",
           Toast.LENGTH_SHORT).show();
   }
 }else{
   Toast.makeText(MainActivity.this,
           "You dont have data to show because the photo is null (your photo isn't in memory device)",
           Toast.LENGTH_SHORT).show();
 }


 and the method that I use in the example is for validate not null or empty
    private boolean notNullNotFill(String validate){
        if(validate != null){
            if(!validate.trim().equals("")){
                return true;
            }else{
                return false;
            }
        }else{
            return false;
        }
    }
See the example of this infomartion return:
All the code has a internal documentation for more explanation of this example.
UTNCources
ExampleMagicalCamera
Feel free to contact me to add yours apps to this list.
MagicalCamera was created to make Android Devoloper's life easy. If you have any feedback please let us know in the issues by creating an issue with this format:
- Write what your feedback is about and add the next "tag" including the square brackets [FEEDBACK]
Suggestions about how to improve the library or new features are welcome. Thanks for choosing us.
Author
A magical camera author, I do the take camera, select photo, rotate picture, convert bitmap, facial recognition, save picture, get information and others...
Contributors
MagicalCamera Contributor (Cutiko) Erick Add a best usage of google play library, and he develop the better usage of permissions, and an excellent code refactor for permission class and other components.
MagicalCamera Contributor (arthursz) Arthur create the return path of the image saved like a String.
The goal for MagicalCamera is to allow Android Developers care about what is important, feautures not getting worry about something that should be trivial such as taking a picture. We look forward to make this a great library to make image capture process simple and painless. There are amny features and other issues waiting. If you would like to contribute please reach to us, or maybe be bold! Getting a surprise pull request is very gratifying.
https://www.youtube.com/watch?v=U-JxaFZDSn4
Copyright 2016 Fabian Rosales
Licensed under the Apache License, Version 2.0 (the "License"); you may not use this file except in compliance with the License. You may obtain a copy of the License at
http://www.apache.org/licenses/LICENSE-2.0
Unless required by applicable law or agreed to in writing, software
distributed under the License is distributed on an "AS IS" BASIS,
WITHOUT WARRANTIES OR CONDITIONS OF ANY KIND, either express or implied.
See the License for the specific language governing permissions and
limitations under the License.


