-
Notifications
You must be signed in to change notification settings - Fork 11
Aparna Systems Installation Guide
© Copyright 2018 Aparna Systems
SNAPS from CableLabs consists of two steps - SNAPS Boot and SNAPS OpenStack to deploy OpenStack on bare metal nodes. These steps are adapted for use with Aparna Systems’ uCloud 4015, an ultra-converged cloud edge system. Details of this system can be found at Aparna’s website: www.aparnasystems.com.
SNAPS Boot is documented in this wiki and SNAPS OpenStack is provided in the companion wiki.
The first step involves preparing the host nodes (compute and controller nodes) by setting up a configuration node for PXE booting. This is called SNAPS-BOOT. Instructions for this step are provided at:
SNAPS OpenStack requires a minimum of 3 nodes for a basic configuration – 1 Controller Node and 2 Compute Nodes each with 16GBytes of memory, 80+ GB hard disk, 2 mandatory and 1 optional network interfaces. These nodes must be network boot enabled and IPMI capable.
Minimum configuration is chosen to deploy OpenStack/Kolla/Pike on Aparna Systems’ µCloud 4015. All the nodes are Aparna OServ8 µServers with standard hardware – 64GBytes of memory and an Intel Broadwell D1541 CPU. One Fabric Module (non-HA configuration in 4015) is required which allows each µServer to have one 10G physical interface. As the SNAPS/OpenStack requires at least 2 network interfaces, SR-IOV functionality available in the D-1541 processor is utilized. Details of how this is accomplished is provided in the preparation of the nodes. These nodes are network boot enabled and are accessible via IPMI.
According to SNAPS guide, a server machine with 64bit Intel AMD Architecture with 16GB RAM and 1 network interface is required. This machine must be able to reach the host nodes via IPMI. With Aparna Systems’ 4015 setup, an external server meeting the requirements of SNAPS is configured as shown in section 3.
SNAPS OpenStack deployment requires 3 network interfaces – management, tenant and data. Tenant interface is an internal interface between the deployed nodes in the system and does not require an external connection from the Fabric Module to the external world. However, the other two interfaces, management and data, are required to be connected to the external world. Two 40G/10G ports of the Fabric Module will be connected (either in the breakout mode or straight connection) to an external switch which in turn lets the host nodes and the configuration node talk to the outside world.
As shown in Figure 1, a typical discrete node implementation of OpenStack consists of controller node(s), compute node(s), storage node(s), the configuration node and switch(es) to connect these nodes. In addition, the interconnection between these nodes could get complicated by the number of nodes in the implementation.
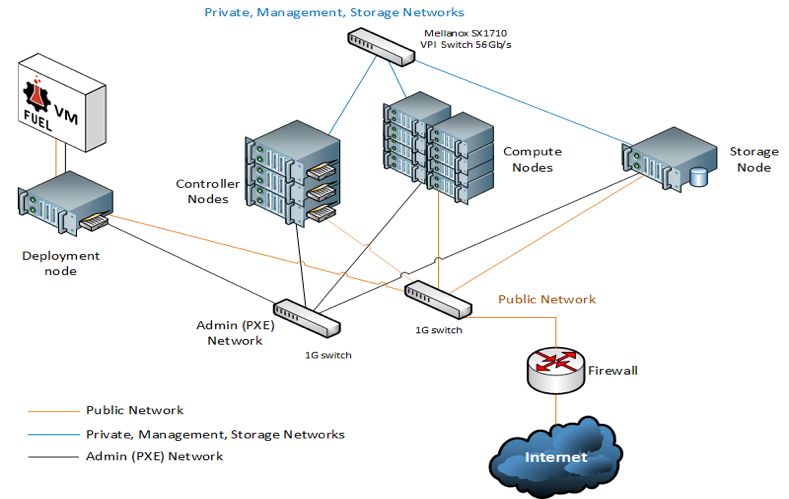
Figure 1 - Discrete Component Implementation (source - Mellanox)
As shown in Figure 2, Aparna SNAPS OpenStack implementation consists of one Aparna µCloud 4015 system with the required number of controller, compute and storage nodes (combining for a total of 15 µServers), all the associated network connections among these nodes are embedded in the system. The external components are the two switches – one for Fabric Module and PXE and one share site switch for OpenStack data and management interfaces.
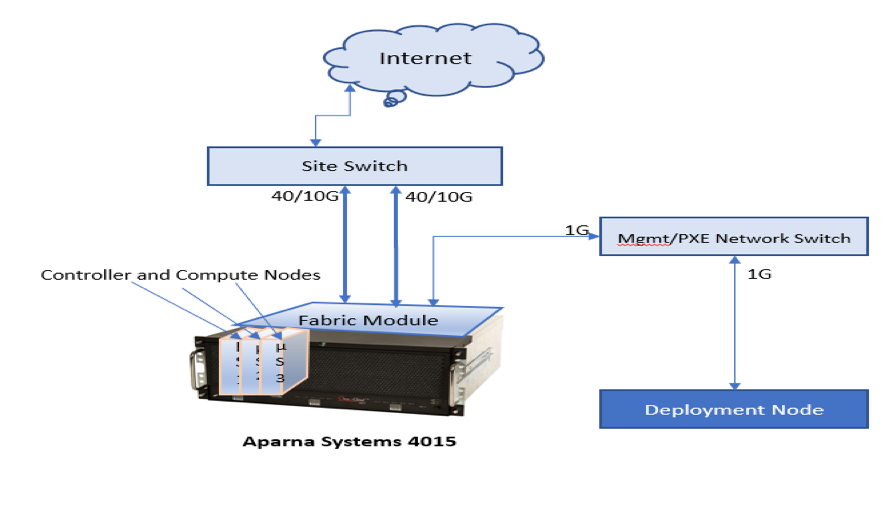
Figure 2 - Aparna SNAPS Implementation Configuration
Update to Ubuntu 16.04.0x Server edition as per the local network management guidelines.
Accessing the µServers from an external server requires Mozilla Firefox ESR version with Java Runtime version 8.
Remove the current version of Firefox that comes installed to reduce the conflicts/issues
apt remove firefox
Install the ESR version of Firefox and java8
echo "deb <http://ppa.launchpad.net/webupd8team/java/ubuntu> trusty main" | tee
/etc/apt/sources.list.d/webupd8team-java.list

echo "deb-src <http://ppa.launchpad.net/webupd8team/java/ubuntu> trusty main" |
tee -a /etc/apt/sources.list.d/webupd8team-java.list

echo oracle-java8-installer shared/accepted-oracle-license-v1-1 select true |
/usr/bin/debconf-set-selections

apt-key adv --keyserver hkp://keyserver.ubuntu.com:80 --recv-keys EEA14886

apt-get update

export DEBIAN_FRONTEND=noninteractive

sudo add-apt-repository ppa:dirk-computer42/c42-backport

apt-get install -y oracle-java8-installer

apt-get install -y iceweasel
Accessing the three servers from the web browser just installed is possible after enabling the IP Forwarding step on the Fabric Module (4.2.1)
After installing the browser – make sure to add the external BMC IP Addresses of the three servers to the exception list in the file at ~/.java/deployment/security/exception.sites. Below is an example
user@server109:~/.java/deployment/security$ cat exception.sites
https://192.168.3.202
https://192.168.3.203
https://192.168.3.204
Preparation of Fabric Module consists of 3 steps – a) Enable IP Forwarding b) Setup DHCP Relay c) Setting up of BMC Gateway for access by an external node. These are listed below.
Enable IP Forwarding to IPv4 in the networking services
root@OcNOS:/# echo 1 > /proc/sys/net/ipv4/ip_forward
Update /etc/sysctl.conf file to enable Ipv4 IP Forwarding
# Uncomment the next line to enable packet forwarding for IPv4
net.ipv4.ip_forward=1
Add rules to iptables
root@OcNOS:~# iptables -t nat -A POSTROUTING -o eth0 -s 192.168.13.102 -j
SNAT --to-source 192.168.3.202
root@OcNOS:~# iptables -t nat -A PREROUTING -i eth0 -d 192.168.3.202 -j DNAT
--to-destination 192.168.13.102
Verify the rules exist in the iptables
root@OcNOS:~# iptables -t nat -L
Chain PREROUTING (policy ACCEPT)
target prot opt source   destination
DNAT   all  --  anywhere 192.168.3.202   to:192.168.13.102

Chain INPUT (policy ACCEPT)
target prot opt source destination

Chain OUTPUT (policy ACCEPT)
target prot opt source destination

Chain POSTROUTING (policy ACCEPT)
target prot opt source         destination
SNAT   all  --  192.168.13.102 anywhere     to:192.168.3.202
Install tool to make iptables persistent
apt install iptables-persistent
Save IP tables
iptables-save
Adding additional servers – add the following lines /etc/iptables/rules.ip4
-A PREROUTING -d 192.168.3.203/32 -i eth0 -j DNAT --to-destination
192.168.13.103
-A POSTROUTING -s 192.168.13.103/32 -o eth0 -j SNAT --to-source 192.168.3.203
-A PREROUTING -d 192.168.3.204/32 -i eth0 -j DNAT --to-destination
192.168.13.104
-A POSTROUTING -s 192.168.13.104/32 -o eth0 -j SNAT --to-source 192.168.3.204
Restore IP Tables
iptables-restore < /etc/iptables/rules.v4
Add external IP address of BMC address for Fabric module mgmt. port for IP Forwarding
ip addr add 192.168.3.202 dev eth0
ip addr add 192.168.3.203 dev eth0
ip addr add 192.168.3.204 dev eth0
Verify addresses are added
ip a
This step allows the DHCP from µServers to be relayed to the DHCP server running on the configuration node.
Edit the /etc/default/isc-dhcp-relay file to allow the DHCP requests from µServers to be forwarded to the external configuration server
# What servers should the DHCP relay forward requests to?
#SERVERS="127.0.0.1"

# µServer’s dhcp requests will be forwarded to configuration server – external
server
SERVERS="192.168.3.109"

# On what interfaces should the DHCP relay (dhrelay) serve DHCP requests?
INTERFACES="eth0 eth1"
#INTERFACES="eth1"

# Additional options that are passed to the DHCP relay daemon?
OPTIONS="-D"
Ensure isc-dhcp-relay is running
root@OcNOS:/# systemctl start isc-dhcp-relay
root@OcNOS:/# systemctl status -l isc-dhcp-relay

● isc-dhcp-relay.service - LSB: DHCP relay
Loaded: loaded (/etc/init.d/isc-dhcp-relay)
Active: active (running) since Wed 2018-04-11 22:59:09 UTC; 2s ago
Process: 24029 ExecStart=/etc/init.d/isc-dhcp-relay start (code=exited,
status=0/SUCCESS)
CGroup: /system.slice/isc-dhcp-relay.service
└─24032 /usr/sbin/dhcrelay -q -D -i eth0 -i eth1 192.168.3.109

Apr 11 22:59:09 OcNOS systemd[1]: Started LSB: DHCP relay.
This step allows the BMCs to be accessed from the external server by changing the BMC GW IP address
Ipmitool -H 192.168.13.103 -U ADMIN -P ADMIN lan set defgw ipaddr 192.168.13.97
(lower slot)

OR

Ipmitool -H 192.168.13.103 -U ADMIN -P ADMIN lan set defgw ipaddr 192.168.13.98
(upper slot)
Sample configuration
root@OcNOS:/# ipmitool -H 192.168.13.102 -U ADMIN -P ADMIN lan set 1 defgw
ipaddr 192.168.13.98
root@OcNOS:/# ipmitool -H 192.168.13.103 -U ADMIN -P ADMIN lan set 1 defgw
ipaddr 192.168.13.98
root@OcNOS:/# ipmitool -H 192.168.13.104 -U ADMIN -P ADMIN lan set 1 defgw
ipaddr 192.168.13.98
After this step, the BMCs of servers can be accessed from the configuration node by running the Firefox ESR browser and providing the address as added above, for example: http://192.168.3.202 for the server in slot 2.
Collection of Mac addresses of BMCs is optional as in Aparna system they are in a different subnet (.13) and can be managed with IP addresses. Hosts.yaml file has fields for the MAC addresses. These can be collected from the configuration node with the IPMITOOL with lan print. These will be used to fill in the hosts.yaml file later on.
user@snap-210:~$ sudo ipmitool -H 192.168.13.102 -U ADMIN -P ADMIN lan print
| grep "MAC Address"
MAC Address : e8:fd:90:00:00:95
user@snap-210:~$ sudo ipmitool -H 192.168.13.103 -U ADMIN -P ADMIN lan print
| grep "MAC Address"
MAC Address : e8:fd:90:00:00:8d
user@snap-210:~$ sudo ipmitool -H 192.168.13.104 -U ADMIN -P ADMIN lan print
| grep "MAC Address"
MAC Address : e8:fd:90:00:00:78
BIOS settings of any uServer can be changed from the iKVM console program from the Firefox browser accessing the server. For example, accessing the uServer in slot 2 at address 3.202 is done by providing the IP address 192.168.3.202 on the browser address bar – access using the local user/password provided according to the local networking guidelines.
Setup Utility -> Advanced -> Peripheral Configuration -> PCIe SR-IOV -> Enabled
Setup Utility -> Advanced -> H2O IPMI Configuration -> Boot Option Support
-> Enabled
Setup Utility -> Boot -> Boot Type -> Legacy
Setup Utility -> Boot -> Network Stack -> Enabled
Setup Utility -> Boot -> PXE Boot capability -> Legacy
Setup Utility -> Boot -> Add Boot Options -> Last
Setup Utility -> Boot -> Automatic Failover -> Disabled
Setup Utility -> Exit -> Exit Saving Changes
Yes
Make bootable disk the first drive in the list of Legacy Hard Drive List by pressing F6 and F5 keys (please use the Virtual Keyboard or change the Options/Hot Key settings to make F5 key different for Ctrl-Alt-Del)
Change the boot order to make sure slot 0000 or slot 0001 is the first in the network boot section depending on the Switch slot.
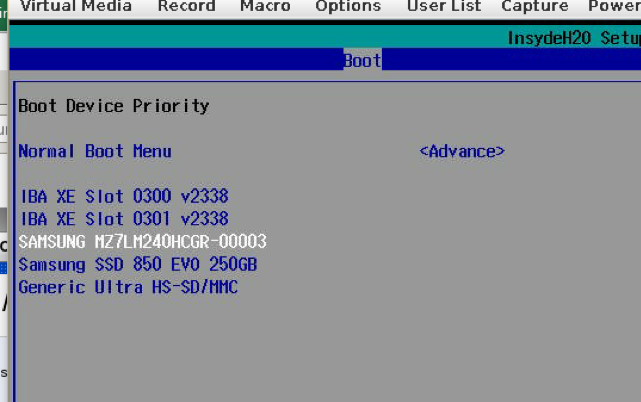
Desired Boot order – bootable OS disk first and then network boot devices in the order required
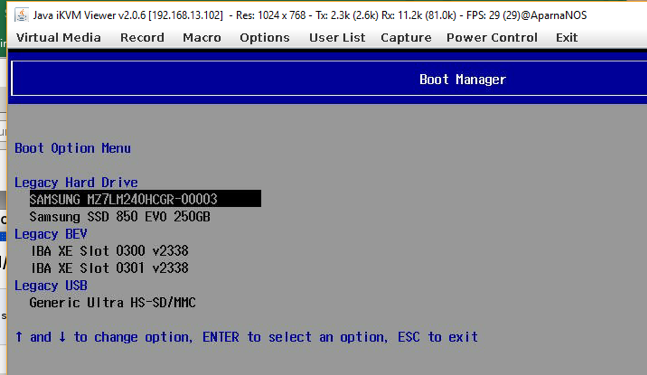
Once the nodes are prepared for SNAPS-Boot, the process to boot these nodes follows the SNAPS Boot installation guide at:
https://github.com/cablelabs/snaps-boot/blob/master/doc/source/install/install.md
wget https://github.com/cablelabs/snaps-boot/archive/master.zip
Unzip master.zip – creates a snaps-boot-master directory
user@server109:~/snaps-boot-master/
Place it in folder snaps-boot/packages/images/. Use this download link for ISO: http://releases.ubuntu.com/16.04/ubuntu-16.04.4-server-amd64.iso.
cd snaps-boot/
mkdir -p packages/images
cd packages/images
wget http://releases.ubuntu.com/16.04/ubuntu-16.04.4-server-amd64.iso
Go to directory snaps-boot-master/conf/pxe_cluster
Sample for one host.
| bind_host: | |
|---|---|
| - | |
| ip: "192.168.60.171" | DHCP Address given at PXE boot |
| mac: "e8:fd:90:00:00:a3" | Host MAC Addresses – µServer or BIOS |
Go to directory snaps-boot-master/
Run PreRequisite.sh as shown below:
sudo ./scripts/PreRequisite.sh
If you see failuers or errors. Update your software, remove obsolete packages and reboot your server.
sudo apt-get update
sudo apt-get upgrade
sudo apt-get auto-remove
sudo reboot
sudo -i python $PWD/iaas_launch.py -f $PWD/conf/pxe_cluster/hosts.yaml -p
Add the DHCP Relay configuration parameters to dhcp.conf file
Edit - /etc/dhcp/dhcpd.conf to add the following lines before PXE booting the servers
subnet 192.168.3.0 netmask 255.255.255.0 {
# range 192.168.3.244 192.168.3.245;
}
The default iaas_launch.py with -b options reboots which resets the BMC GW address so please use the following commands to boot the servers instead of using the iaas_launch.py command.
During PXE boot, the disk parameters may need interaction to ensure proper drive is used for installation. Aparna uServer has 3 drive interfaces
Use the commands below to PXE boot the servers.
user@server109:~/snaps-boot-master$ ipmitool -H 192.168.3.202 -U ADMIN -P ADMIN
chassis bootdev pxe
Set Boot Device to pxe
user@server109:~/snaps-boot-master$ ipmitool -H 192.168.3.203 -U ADMIN -P ADMIN
chassis bootdev pxe
Set Boot Device to pxe
user@server109:~/snaps-boot-master$ ipmitool -H 192.168.3.204 -U ADMIN -P ADMIN
chassis bootdev pxe

Set Boot Device to pxe

user@server109:~/snaps-boot-master$ ipmitool -H 192.168.3.202 -U ADMIN -P ADMIN
chassis power reset
Chassis Power Control: Reset
user@server109:~/snaps-boot-master$ ipmitool -H 192.168.3.203 -U ADMIN -P ADMIN
chassis power reset
Chassis Power Control: Reset
user@server109:~/snaps-boot-master$ ipmitool -H 192.168.3.204 -U ADMIN -P ADMIN
chassis power reset
Chassis Power Control: Reset
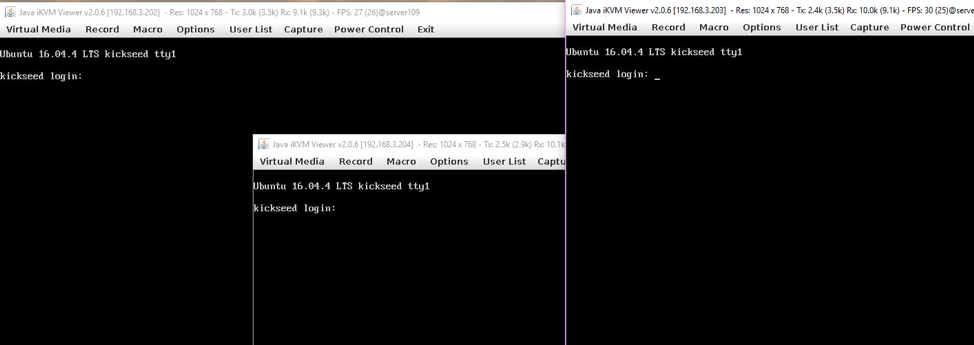
After the boot, all the servers can be accessed via Firefox/iKVM console and they look as below:
